
You can convert an EDB file to PST without Exchange Server by using an offline EDB converter. Load the .edb file into the tool, let it scan the database, preview the mailboxes, choose PST as the output format and export. You do not need to install Exchange or mount the database first.
This question usually comes up after something has already gone wrong. The old server was retired, the hardware died, or a client hands you a drive with a priv1.edb on it and asks for their emails back. The Exchange server that created the file is gone, and nobody wants to build a new one just to read a few mailboxes. This guide shows the quick way, using DT Exchange EDB Recovery Tool, with every step matched to a screenshot so you can follow along on your own screen.
Why Exchange Itself Cannot Help When the Server Is Gone
Microsoft's own way to make a PST is the New-MailboxExportRequest command, or the Export to a .pst file option in the Exchange Admin Center. It works well, but only inside a running Exchange organization. As per Microsoft's documentation, the account doing the export needs the Mailbox Import Export role, which is not assigned to any role group by default. The PST also has to be saved on a UNC network share where the Exchange Trusted Subsystem group has read and write permission. And the mailbox you want must already sit in a database that is mounted on that server.
So if all you have is a loose EDB file, the native route means building a matching Exchange server first, restoring the database into it, and only then exporting. That is a lot of hours for a one-time job. An offline converter skips all of it. It reads the EDB file directly, so no server, no roles and no network share are involved.
What to Prepare Before You Start
Five minutes of preparation saves you from most of the trouble later.
- Make a copy of the EDB file. Work on the copy and keep the original untouched until you have checked the PST.
- Find the STM file, if there is one. Older Exchange versions kept part of the data in a companion .stm file. Newer versions do not need it.
- Check the free space. Keep enough room on the destination drive for the PST files. They can be close to the size of the mailbox data.
- Create an empty folder for the output. A folder like DT_Exchange_Export keeps things easy to find.
- Note how the database stopped. If it came from a crash or a dismounted store, you will want Advance Scan in the next section. If you want to check the state yourself, run
eseutil /mhon the file and look for Clean Shutdown or Dirty Shutdown.
Quick Scan or Advance Scan: Which One Should You Pick?
The tool gives you two scan modes when you add the file. Choosing the right one is the only real decision in the whole process.
| Scan mode | Use it when | What it does |
|---|---|---|
| Quick Scan | The EDB file is healthy or was mounted when it was last used | Reads the database as it is and loads the mailboxes fast |
| Advance Scan | The file is corrupted or unmounted, or you suspect deleted data | Does a deep forensic scan with sector carving to recover deleted messages and unlinked mailboxes |
How to Convert EDB to PST Without Exchange Server: Step by Step
Step 1: Download, install and open the tool
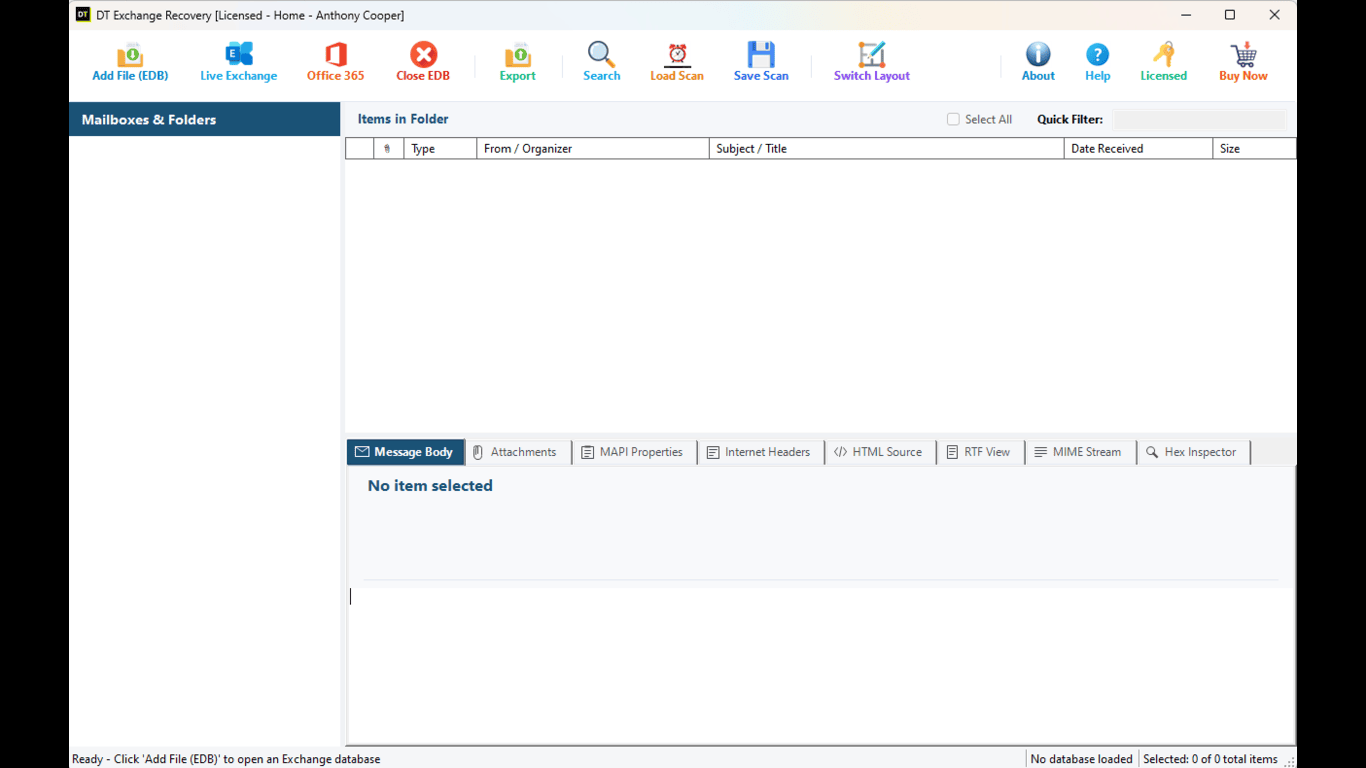
Download DT Exchange EDB Recovery Tool, install it on your Windows PC and launch it. You will see a clean main window with three areas.
Across the top is the toolbar: Add File (EDB), Live Exchange, Office 365, Close EDB, Export, Search, Load Scan, Save Scan and Switch Layout. On the left is the Mailboxes & Folders pane. In the middle is the list of items in the selected folder. At the bottom is the preview area, with tabs for Message Body, Attachments, MAPI Properties, Internet Headers, HTML Source, RTF View, MIME Stream and Hex Inspector. The status bar at the bottom tells you it is ready and waiting for a database.
Step 2: Click Add File (EDB) and choose your database
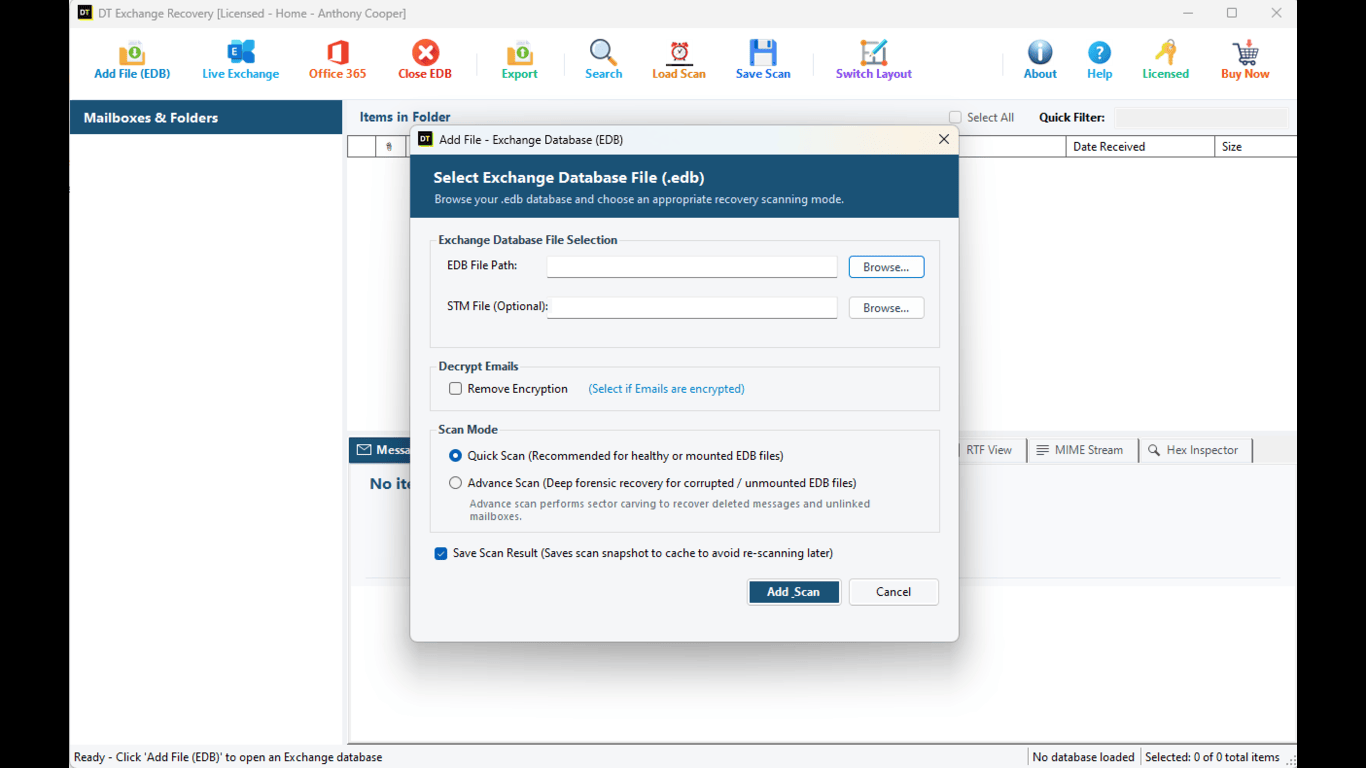
Click Add File (EDB) on the toolbar. A window called Select Exchange Database File (.edb) opens. Fill it in from top to bottom.
1. Next to EDB File Path, click Browse and select your .edb file, for example priv1.edb.
2. Next to STM File (Optional), click Browse and select the .stm file only if you have one. Otherwise leave it empty.
3. Under Decrypt Emails, tick Remove Encryption only if the emails in this database are encrypted.
4. Under Scan Mode, choose Quick Scan for a healthy or mounted file, or Advance Scan for a corrupted or unmounted one.
5. Keep Save Scan Result ticked. It saves a snapshot of the scan, so you do not have to scan the same file again later. You can bring it back with Load Scan.
6. Click the Add Scan button at the bottom.
Step 3: Wait for the scan and preview your mailboxes
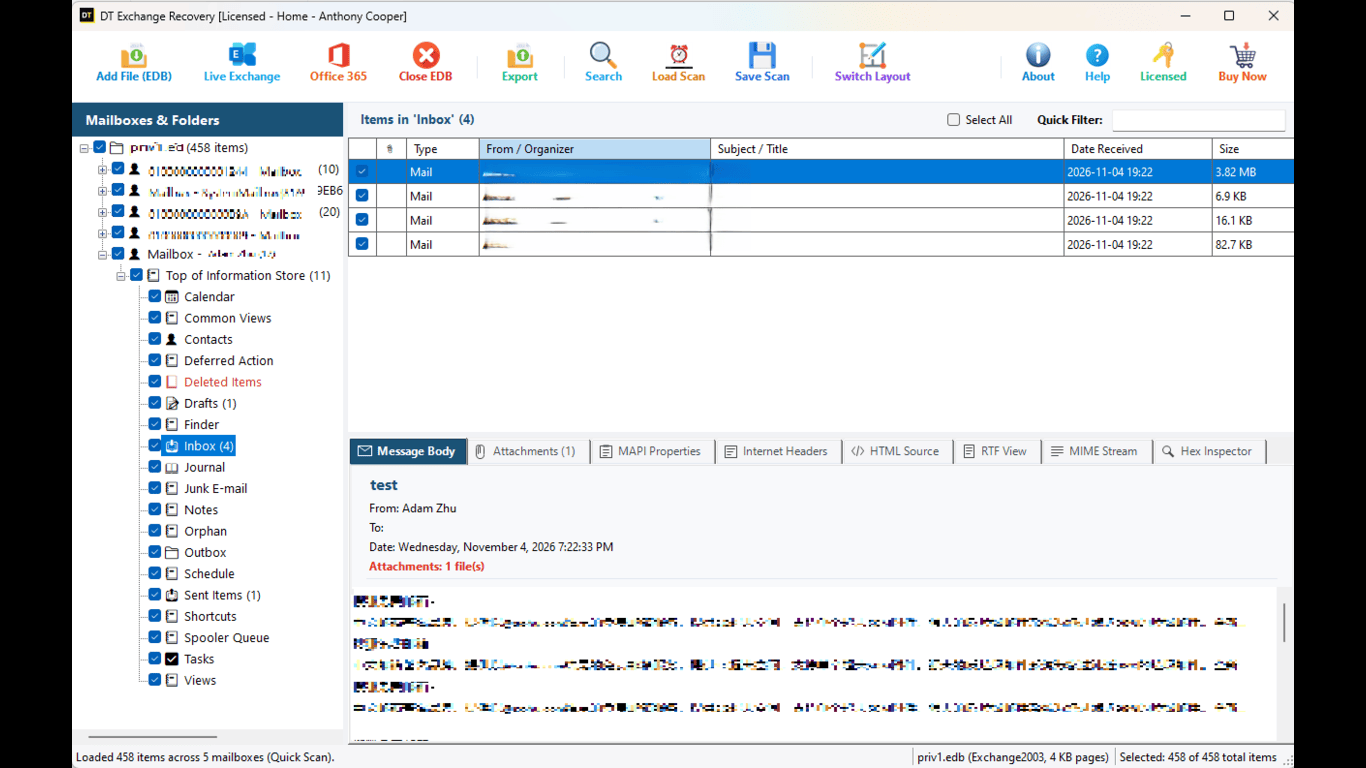
The tool scans the file and builds the whole mailbox tree on the left. In our test, the status bar reports that 458 items were loaded across 5 mailboxes with Quick Scan, and it shows the file name, priv1.edb, next to the Exchange page size.
Now take a minute to look around before you export anything:
- Expand a mailbox and click any folder, such as Inbox, to see its items in the middle list.
- Click one message and read it in the Message Body tab. Check the Attachments tab if the message has files.
- Notice that the Deleted Items folder is highlighted in red, so recovered deleted content is easy to spot.
- Use the tick boxes in the tree to leave out mailboxes or folders you do not need. Use Quick Filter or Search if you are looking for something specific.
- Look at the bottom right, where it says how many items are selected out of the total. If the number matches what you expected, you are good.
Step 4: Click Export and pick what to export
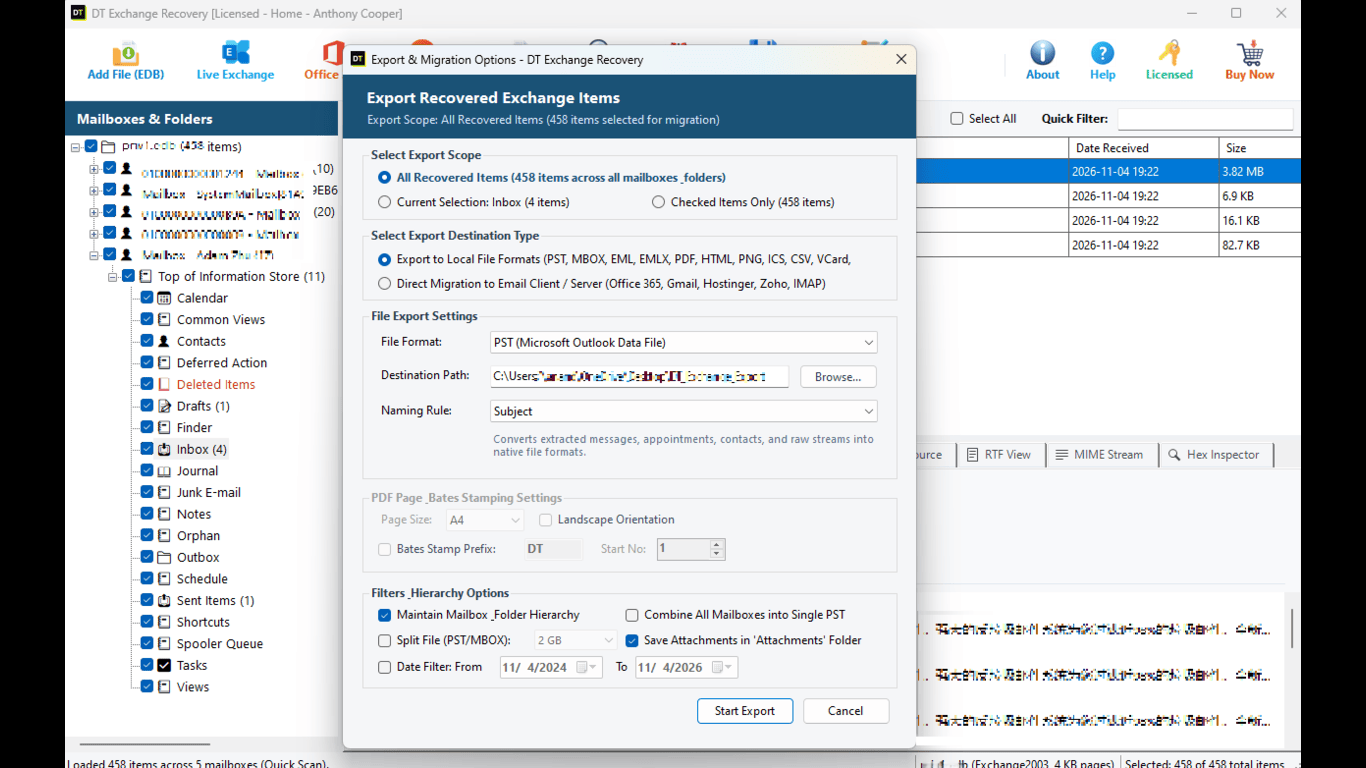
Click Export on the toolbar. The Export Recovered Exchange Items window opens. First, decide the scope under Select Export Scope:
- All Recovered Items exports every item from every mailbox and folder.
- Current Selection exports only the folder you have open, for example the Inbox.
- Checked Items Only exports whatever you ticked in the tree.
Step 5: Select PST as the format and set the destination
In the File Export Settings box:
- Open the File Format drop-down and select PST (Microsoft Outlook Data File).
- Click Browse next to Destination Path and choose the empty folder you created earlier.
- Leave Naming Rule on Subject. It matters mostly for single-message formats like EML, so PST users can ignore it.
- You may notice that the PDF Page and Bates Stamping settings are greyed out. That is normal. They only turn on when you pick PDF.
Step 6: Set the filters and hierarchy options
The last box on the window controls how the PST files come out. Here is what each option does:
- Maintain Mailbox Folder Hierarchy: keeps your Inbox, Sent Items, Calendar and other folders in their original structure. Leave it ticked.
- Combine All Mailboxes into Single PST: tick this if you want everything inside one PST file. Leave it off if you prefer to keep mailboxes separate.
- Split File (PST/MBOX): breaks a large output into smaller parts. The window offers 2 GB as a size. Use it for big mailboxes, because a small PST is easier to move and open.
- Save Attachments in Attachments Folder: ticked by default.
- Date Filter: tick it and set a From and To date if you only need mail from a certain period.
Step 7: Start the export and open the PST in Outlook
Click Start Export and let the tool finish. When it is done, open the destination folder and you will find your PST file or files waiting.
To open one in Outlook, go to File, then Open & Export, then Open Outlook Data File, and pick the PST. It appears in the folder list on the left, and you can drag items into your normal mailbox if you want them there.
Bonus: Extract Mailboxes From a Running Exchange or Microsoft 365
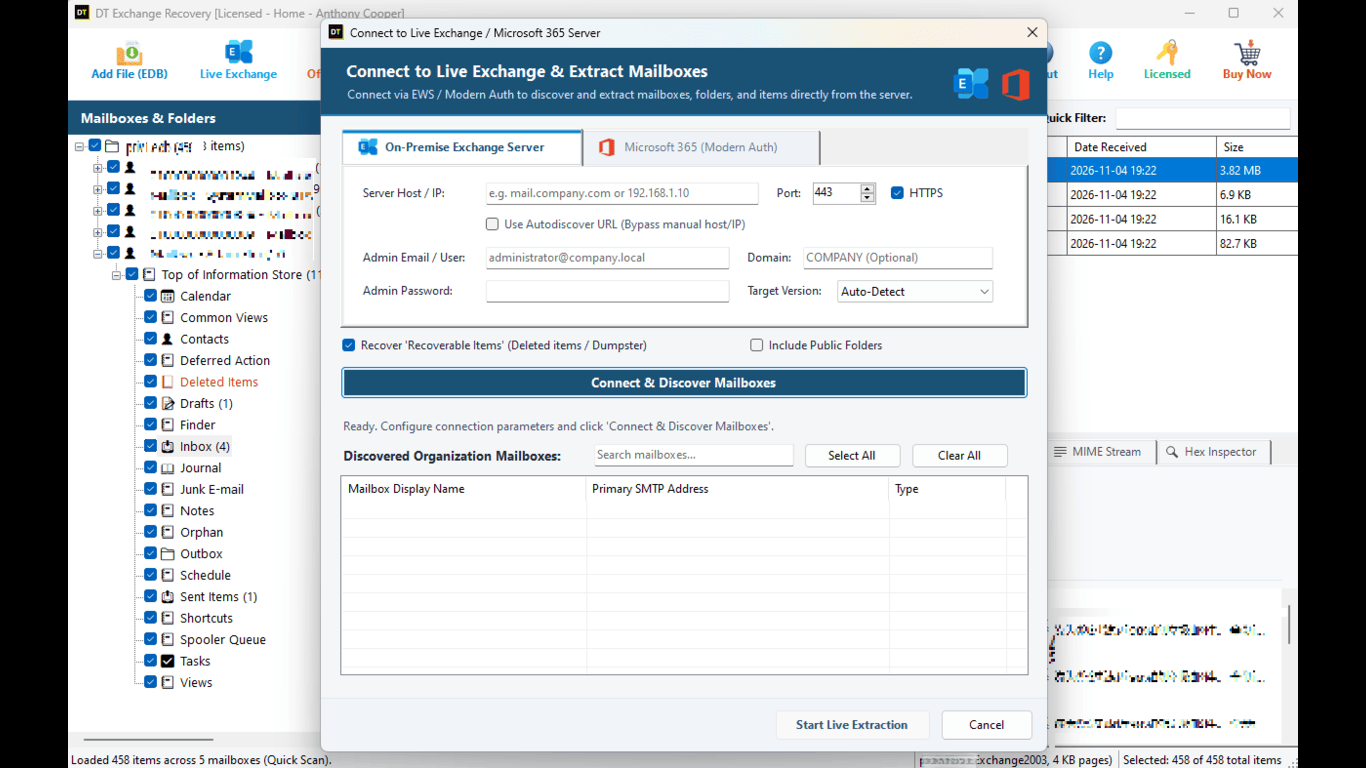
Sometimes the server is still alive and you simply need PST files without the Mailbox Import Export role and the UNC share. The same tool can do it. Click Live Exchange on the toolbar and the Connect to Live Exchange & Extract Mailboxes window opens.
There are two tabs, On-Premise Exchange Server and Microsoft 365 (Modern Auth). For an on-premise server:
1. Enter the Server Host / IP. The port is already set to 443 with HTTPS ticked. If you prefer, tick Use Autodiscover URL instead of typing a host.
2. Enter the Admin Email / User, the optional Domain, and the Admin Password.
3. Leave Target Version on Auto-Detect unless you have a reason to change it.
4. Keep Recover Recoverable Items (Deleted items / Dumpster) ticked if you also want deleted items. Tick Include Public Folders if you need them.
5. Click Connect & Discover Mailboxes.
6. In the Discovered Organization Mailboxes list, pick the mailboxes you want, or use Select All and Clear All.
7. Click Start Live Extraction.
8. After the mailboxes are extracted, export them to PST using Steps 4 to 7 above.
Native Exchange Export vs an Offline EDB Converter
| What matters | Native Exchange export | DT Exchange EDB Recovery Tool |
|---|---|---|
| Needs a running Exchange server | Yes | No |
| Works with a loose EDB file | No | Yes |
| Needs the Mailbox Import Export role | Yes | No |
| Needs a UNC network share for the PST | Yes | No |
| Mailbox must be mounted | Yes | No |
| Preview mails before exporting | No | Yes, with 8 preview tabs |
| Recovers deleted items and unlinked mailboxes | No | Yes, with Advance Scan |
| Choose folders, dates and split size | Limited | Yes |
Common Problems and Quick Fixes
- A mailbox you expected is missing: Run the file again with Advance Scan. It is built to recover unlinked mailboxes and deleted messages that Quick Scan does not touch.
- The database was not shut down properly: A dirty shutdown state is common after a crash. Use Advance Scan, which is made for corrupted and unmounted files.
- Messages look locked or unreadable: The emails may be encrypted. Add the file again and tick Remove Encryption in the Add File window.
- The PST is too large to handle: Tick Split File and set a smaller size, so the output comes in manageable parts.
- You need to scan the same file again: If you kept Save Scan Result ticked, click Load Scan and bring the old result back. No waiting.
A Few Habits That Save Time
These come from years of handling EDB files for other people. Test with one small mailbox first, before you export everything. Compare the item count in the tool with the count in Outlook afterwards. Keep the original EDB until you have opened the PST and checked a few old emails and attachments. And if the file is from a dead server, go straight to Advance Scan. It costs more time but saves you a second run.
Frequently Asked Questions
Can I convert an EDB file to PST without Exchange Server?
Yes. An offline EDB converter reads the .edb file directly, so you do not need an Exchange server. Add the file, scan it, preview the mailboxes, select PST as the format and export. The whole job runs on a normal Windows PC.Can I open an EDB file without Exchange?
Yes. After you add the file to DT Exchange EDB Recovery Tool, every mailbox and folder is shown in a tree. You can read each message, check attachments and look at headers before you decide to export anything.What is the difference between Quick Scan and Advance Scan?
Quick Scan is for healthy or mounted EDB files and loads quickly. Advance Scan is for corrupted or unmounted files. It does a deep forensic scan with sector carving to recover deleted messages and unlinked mailboxes, so it takes longer.Do I need the STM file?
Only if your database came from an older Exchange version that stored data in a companion .stm file. The STM field in the tool is optional, so leave it empty if you do not have one.Can I export one mailbox instead of the whole database?
Yes. Untick the mailboxes you do not need in the tree, then choose Checked Items Only in the export window. You can also pick Current Selection to export just the folder you have open.Will my folder structure stay the same in the PST?
Yes, when Maintain Mailbox Folder Hierarchy is ticked. Your Inbox, Sent Items, Calendar and other folders appear in the PST the same way they were in the mailbox.Can I split a large PST file?
Yes. Tick Split File (PST/MBOX) in the export window and choose a size. The output is then created in smaller parts, which are easier to store, copy and open.Can I save the scan and come back later?
Yes. Keep Save Scan Result ticked when you add the file. Next time, use Load Scan to bring back the saved result without scanning the database again.Conclusion
Converting an EDB file to PST does not have to mean rebuilding a server. Add the file, pick Quick Scan or Advance Scan, preview what is inside, choose PST, set your options and click Start Export. That is the whole job.
If you have an EDB file waiting on a drive, try the steps above with DT Exchange EDB Recovery Tool, and get your mailboxes back in Outlook.
Related Reading
- PST Migrator to move PST files to Office 365, Gmail or IMAP
- PST Toolkit to split or merge PST files
- OST Converter to convert OST files
- PST to MBOX Converter to export PST data to MBOX