
Here is a story I hear all the time. A team moves its files to SharePoint. Everyone is told that from now on, shared work lives there. A few months later, the same files are still sitting in people's OneDrive, because nobody wanted to delete the original. Then someone downloads a file from SharePoint, uploads it to OneDrive, edits it, and now there are three versions of the same document and nobody knows which one is right.
Sound familiar? If you work in Microsoft 365, it probably does.
OneDrive and SharePoint are both Microsoft services, so you would expect Microsoft to tell you when the same file exists in both. It does not. Each one looks only at its own storage. There is no built-in report that says, "This file in OneDrive also exists in your SharePoint library."
This guide shows you how to find duplicate files between OneDrive and SharePoint, and how to remove them safely, using Cloud Duplicate File Finder & Remover from Data TB Software. I will also explain why the manual methods are so painful, so you can decide how you want to spend your time.
Why duplicates build up between OneDrive and SharePoint
OneDrive is personal storage. SharePoint is shared storage for teams, sites and departments (and files shared in Teams channels are stored in SharePoint as well). Because people constantly move work between the two, duplicates are almost guaranteed. The most common causes are these.
- Moving files from OneDrive to SharePoint and keeping the original. This is the number one reason. Copying feels safer than moving, so the old copy stays behind.
- Sync conflicts. When the sync client cannot decide which version is newest, it keeps both, and the extra file often has the computer name added to its name. Over time these "DESKTOP-ABC123" copies pile up.
- Download and re-upload habits. A file is downloaded from a SharePoint library, saved on the desktop, and later uploaded to OneDrive. Now it lives in both places.
- Migrations. Teams that moved from file servers or other clouds into Microsoft 365 often end up with partial copies in several locations.
- Renamed copies. "Budget 2026.xlsx" becomes "Budget 2026 final.xlsx" becomes "Budget 2026 final (1).xlsx". The content is the same, but the names are different, so a simple name search never finds them.
The usual ways people look for duplicates, and where they fall short
I have seen all of these used in real offices. Here is the honest summary.
Searching manually
Some IT guides suggest searching for words like copy, duplicate, (1), (2), final or old in file names. This catches only the obvious cases. It cannot compare OneDrive against SharePoint, and it misses every copy that was renamed in a different way.
Syncing both to your PC
You sync your OneDrive and the SharePoint library to File Explorer, then run a local duplicate finder or a folder comparison program. This works for small libraries. For large ones, you need a lot of free disk space, you wait hours for syncing, and a wrong delete on your PC can sync back and remove the file in the cloud too.
PowerShell scripts
Administrators sometimes use PnP PowerShell to read file hashes from a SharePoint library and group the matches. It is clever, and it works. But you need admin rights, scripting knowledge and time to test, and a standard script covers one library at a time. It is not a plan for a regular employee or a small business owner.
Single-cloud duplicate tools
Some apps scan one account and tell you about duplicates inside it. That is useful, but it does not answer the real question, which is whether the same file exists in OneDrive and in SharePoint.
What people actually want is simple. Connect both places, compare them against each other, see the matches, pick which side to keep, and delete the rest. That is exactly what Cloud Duplicate File Finder & Remover does.
What you need before you start
- A Windows PC with Cloud Duplicate File Finder & Remover installed. Get it from the Cloud Duplicate File Finder page.
- Your Microsoft 365 sign-in for OneDrive and for SharePoint.
- Permission to delete files in the SharePoint libraries you plan to clean. If you are not sure, ask your SharePoint admin first.
- An internet connection.
Try Cloud Duplicate File Finder & Remover
Connect OneDrive and SharePoint directly. Find and remove duplicate files safely across accounts.
Step by step: find and remove duplicates between OneDrive and SharePoint
The screenshots below come from the real application, so what you see should match your own screen.
Step 1: Switch to Multiple Accounts mode
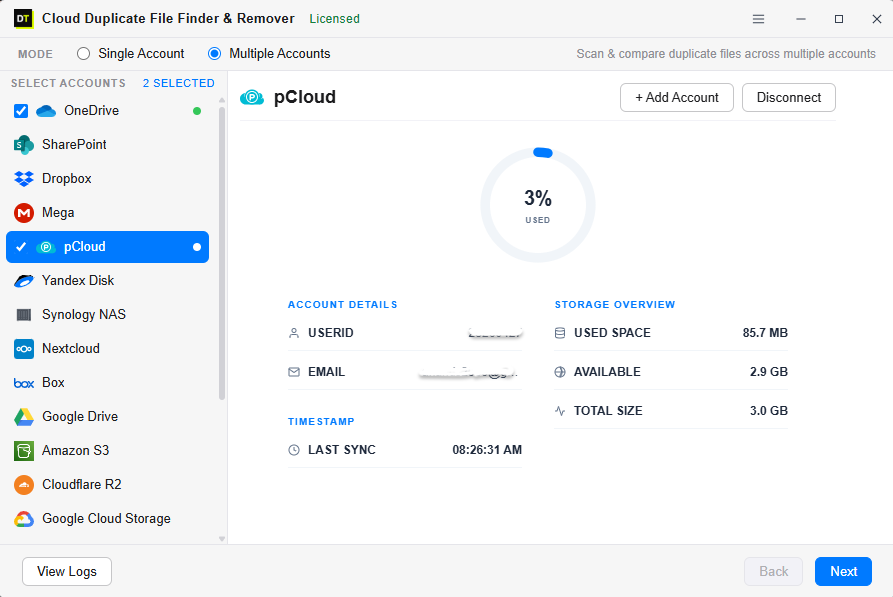
Open the tool. At the top you will see two modes, Single Account and Multiple Accounts. Choose Multiple Accounts. This mode is built to scan and compare duplicate files across several accounts, which is what we need for OneDrive and SharePoint.
Step 2: Connect OneDrive
In the list on the left, click OneDrive and press Connect. A browser window opens, you sign in with your Microsoft account, and you approve the request. When it works, a small green dot appears next to OneDrive in the list.
Step 3: Connect SharePoint
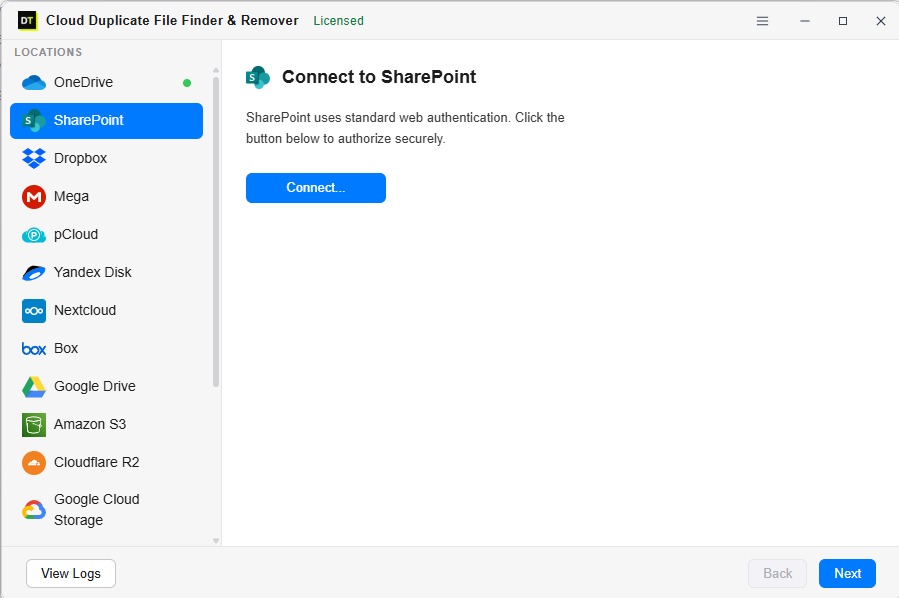
Now click SharePoint in the same list. The screen explains that SharePoint uses standard web authentication and asks you to click the button to authorize securely. Press Connect, sign in with your work account, and allow access.
This is the safe, normal Microsoft sign-in. You enter your password on Microsoft's own page, not inside the tool.
Step 4: Tick both accounts and click Next
Tick the boxes beside OneDrive and SharePoint. The top of the list shows how many accounts are selected, and it should say "2 Selected." When you click on a connected account, the right side shows its details, such as the account email, used space, available space, total size and last sync time. That is a handy way to see how much room you have left before you begin.
Click Next when you are ready.
Step 5: Choose what to scan
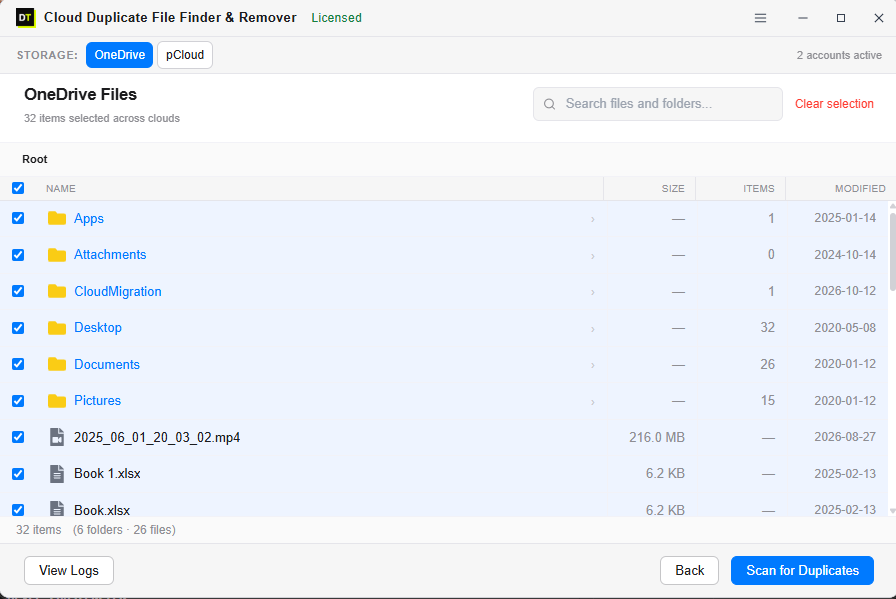
The next screen shows your files and folders. Across the top is a Storage switcher with one button for each cloud, so you can move from the OneDrive tab to the SharePoint tab and choose items in both.
Some useful things to know on this screen.
- Everything in the root is ticked by default, and a counter shows how many items are selected across all the clouds.
- Untick any folder you want to skip, or click the arrow beside a folder to go inside and pick only certain subfolders.
- Use the search box to jump to a folder quickly.
- Clear selection removes all ticks so you can start again with a short list.
When you are happy with the list, click Scan for Duplicates.
Step 6: Pick your scan options
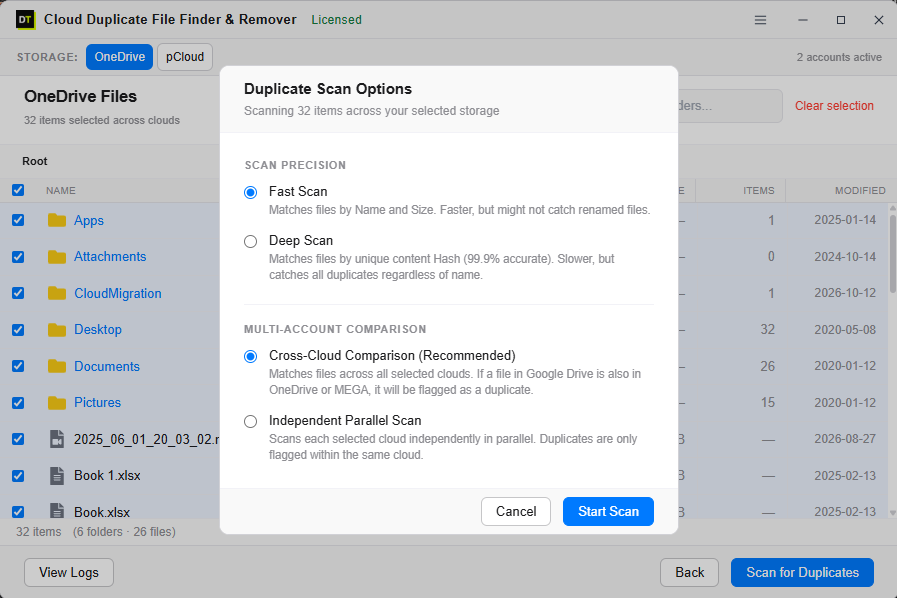
A window called Duplicate Scan Options opens. Two choices matter here.
#### Scan Precision
- Fast Scan matches files by name and size. It is quick, but it may not catch files that were renamed.
- Deep Scan matches files by their unique content hash and is described as 99.9% accurate. It is slower, but it finds duplicates whatever they are called.
- Cross-Cloud Comparison (Recommended) matches files across all the selected clouds. A file that exists in both OneDrive and SharePoint will be flagged as a duplicate.
- Independent Parallel Scan scans each cloud separately. Duplicates are only flagged inside the same cloud.
Step 7: Review the results carefully
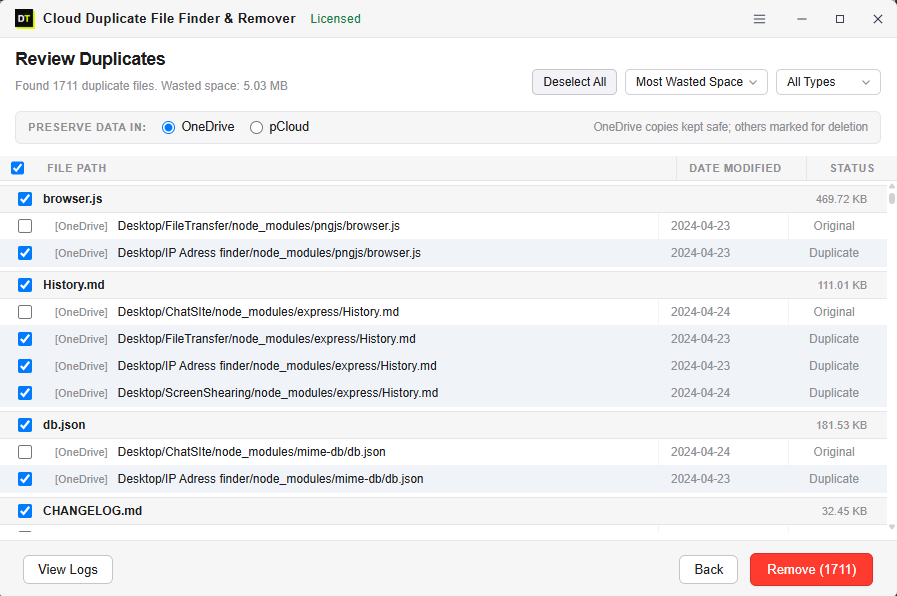
When the scan ends, the Review Duplicates screen opens. At the top you see how many duplicate files were found and how much space they are wasting.
Here is how to read it.
- Matching files are grouped under one name, with the total size shown on the right.
- In each group, one copy is marked Original and left unticked. The other copies are marked Duplicate and ticked.
- Each line shows the cloud, the full path and the modified date, so you can see exactly where each copy lives.
- Most Wasted Space sorts the list so the biggest savings come first.
- All Types filters the list by file type. This is great when you only want to clean up videos or large media files.
- Deselect All unticks everything if you prefer to pick by hand.
- Choose SharePoint if SharePoint is your official home for shared work. The SharePoint copies are kept and the matching OneDrive copies are marked for deletion.
- Choose OneDrive if you want to keep the OneDrive copies and clear the matching ones from SharePoint.
Step 8: Click Remove
When the list looks right, press the red Remove button at the bottom right. The number in brackets tells you how many files are about to be removed. Confirm, wait for the tool to finish, and you are done.
Afterwards, have a look at the recycle bins in OneDrive and SharePoint. Microsoft keeps deleted files in its own recycle bin for a while, and your free space may not fully update until those are emptied.
Fast Scan or Deep Scan: which one is right for you?
Choose Fast Scan if the files were simply copied between OneDrive and SharePoint. Plain copies usually keep the same name and size, so Fast Scan catches them quickly. It is also the best choice for a first look at a large library.
Choose Deep Scan if people have renamed files, if you see lots of "final", "copy" or "(1)" versions, or if you want maximum confidence before deleting a large batch. It checks what is inside each file, so a renamed copy cannot hide.
A simple routine that works well is this. Run Fast Scan first to understand how big the problem is. Then run Deep Scan on your most important folders before the final clean-up.
Cross-Cloud or Independent scan
| Option | What it finds | Best for |
|---|---|---|
| Cross-Cloud Comparison | Files that exist in more than one selected cloud, such as both OneDrive and SharePoint | Finding files copied between your personal and shared storage |
| Independent Parallel Scan | Duplicates inside each cloud on its own | Tidying OneDrive and SharePoint separately |
How to keep duplicates from coming back
- Decide where each kind of file lives. Shared team work belongs in SharePoint. Personal drafts belong in OneDrive. Write it down for your team.
- Move, do not copy. When a file graduates from OneDrive to SharePoint, move it so only one copy exists.
- Fix sync problems early. If you keep seeing files with computer names added, something is wrong with sync, and the duplicates will keep returning until it is fixed.
- Clean after every migration. The first week after a move is when duplicates are easiest to spot.
- Schedule a scan every quarter. A short scan every few months beats one giant clean-up every few years.
Frequently asked questions
Does Microsoft 365 show duplicates between OneDrive and SharePoint?
No. OneDrive and SharePoint each work inside their own storage, and there is no built-in report that compares the two. You need a tool that connects to both, such as Cloud Duplicate File Finder & Remover.
Do I need to sync my libraries to my computer first?
No. You connect your OneDrive and SharePoint accounts directly, choose the folders you want to scan, and run the scan from the tool.
Will it remove the original file as well?
No. In every group, one copy is marked Original and stays unticked. Only the copies marked Duplicate are selected for removal, and you can review and change the selection before you press Remove.
Can I choose whether OneDrive or SharePoint keeps the file?
Yes. Use the Preserve Data In option on the Review Duplicates screen. The cloud you pick keeps its copies, and the matching files in the other cloud are marked for deletion.
What about files with different names?
Use Deep Scan. It compares files by their content hash, so a renamed copy is still recognised. Fast Scan only looks at name and size.
Can I scan a work OneDrive and a personal OneDrive together?
Yes. Use the Add Account button to connect more accounts and include them in the same scan.
Can I include other clouds in the same scan?
Yes. Multiple Accounts mode works with many services, including Google Drive, Dropbox, Mega, Box and Amazon S3, so you can compare more than two clouds at once.
Is it safe to connect my work account?
The tool uses the standard web sign-in of Microsoft. You log in on Microsoft's own page and approve access there, and you can disconnect the account from the tool whenever you like.
Does it work on Mac?
Cloud Duplicate File Finder & Remover is a Windows application, so you run it on a Windows PC.
Final thoughts
Duplicates between OneDrive and SharePoint are not a sign of a badly run team. They are what naturally happens when people move between personal and shared storage every day. The real question is how long you want to spend dealing with them.
You can search by hand, sync everything to your PC, or write PowerShell scripts. Or you can connect both places to one tool, run a Cross-Cloud scan, choose who keeps the files, check the list and press Remove.
Ready to take back your Microsoft 365 storage? Download Cloud Duplicate File Finder & Remover from the Data TB Software product page and run your first scan today.