
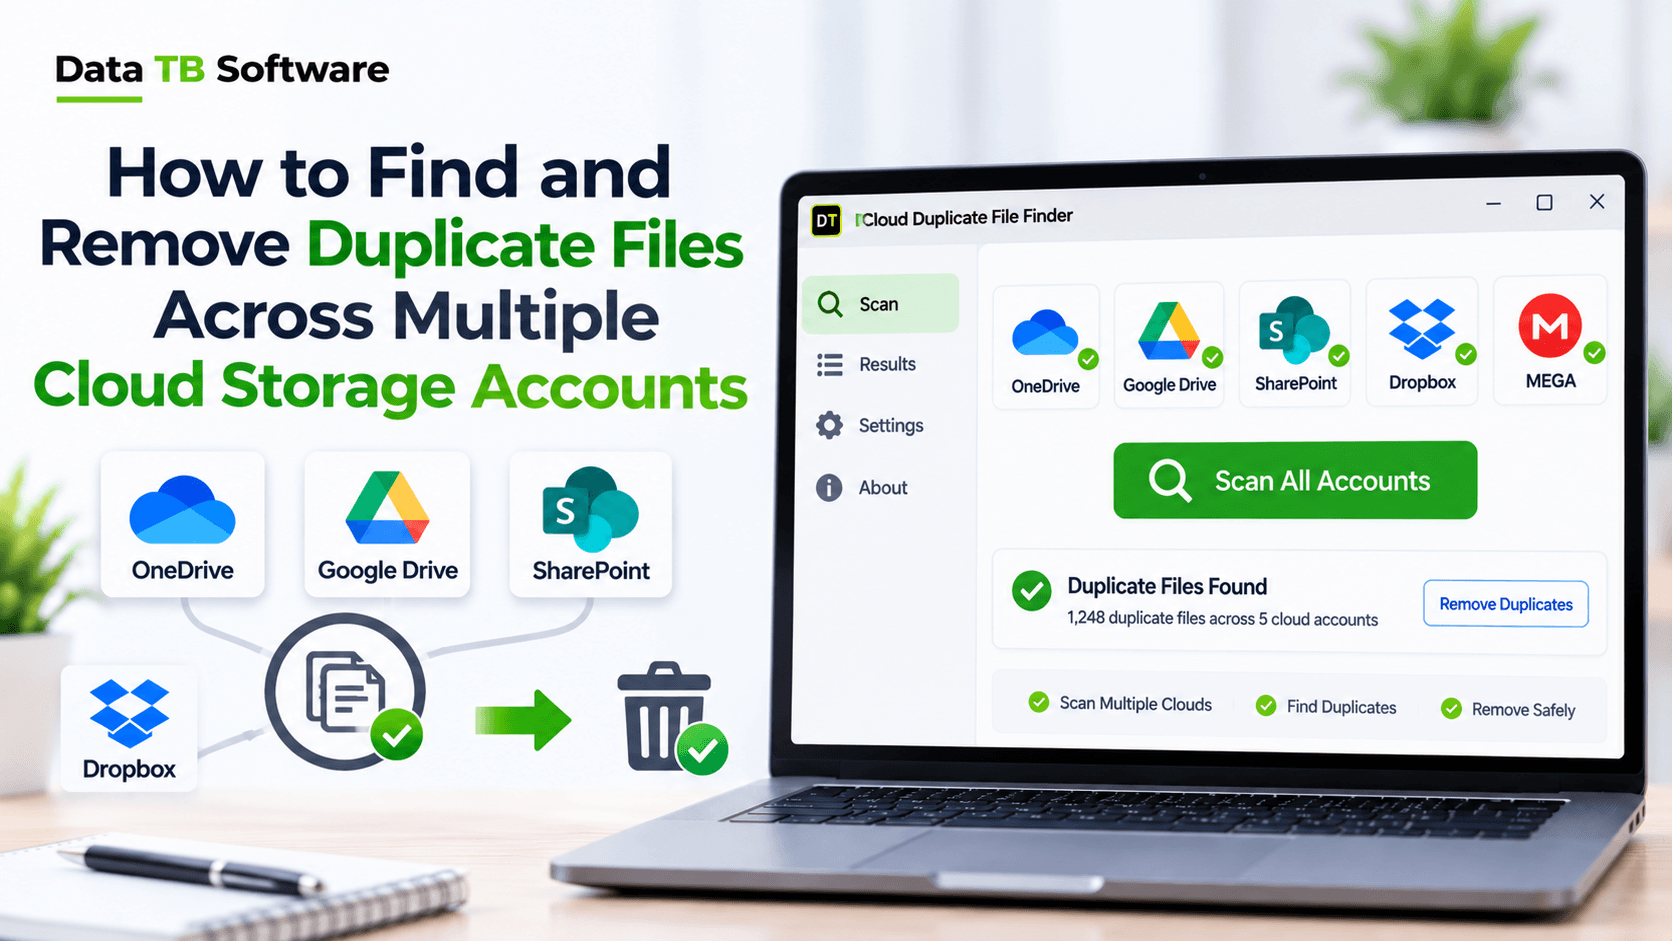
Take a quick count. How many cloud accounts do you have right now? A Google Drive for personal use, a OneDrive that came with Microsoft 365, a Dropbox from an old client project, maybe a Mega or pCloud account you opened for the free space. Add a work account or two and the number gets bigger fast.
Now the harder question. How many of your files are sitting in more than one of them?
Most people have no idea, and there is a reason. Every cloud service only sees its own storage. Google Drive will never tell you that a file also lives in Dropbox. OneDrive will not warn you that the same photo is in your second OneDrive account. The duplicates just sit there, using up space you are paying for or running out of.
This guide shows you how to fix that in one go. You will learn how to find and remove duplicate files across multiple cloud storage accounts, whether they belong to different services or are several accounts of the same service, using Cloud Duplicate File Finder & Remover from Data TB Software. Everything is explained step by step with screenshots, so you can follow along even if you have never done this before.
What does "duplicates across multiple clouds" really mean?
There are three situations, and the tool handles all of them.
- Different clouds. The same file exists in, say, Google Drive and Dropbox. This is the classic cross-cloud duplicate.
- Several accounts of the same cloud. You have two or three Google Drive accounts, or a personal and a work OneDrive, and the same files were uploaded to more than one of them.
- A mix of both. For example, two Google Drive accounts, one OneDrive, one Mega and one Amazon S3 bucket, all in the same scan.
Why duplicates pile up when you use more than one cloud
Nobody sets out to waste storage. Duplicates appear because of normal habits.
- Free storage hunting. People open extra accounts to get free space, then spread the same files across them.
- Migrations that never got cleaned up. You moved from one provider to another and left the old copy behind "just in case."
- Backups of backups. Phone photos go to Google Photos and OneDrive. Documents get copied to Dropbox for safety. Nobody remembers which copy is the real one.
- Shared work. A colleague shares a file from their cloud, you save it to yours, and now it exists twice.
- Old accounts. Former work accounts, college accounts and client accounts still hold files you already copied somewhere else.
- Renamed copies. "Invoice.pdf" turns into "Invoice (1).pdf" or "Invoice final.pdf." The content is identical, but a name search will never connect them.
Why the usual solutions do not really solve it
If you have tried to fix this before, you probably ran into one of these walls.
Single-cloud tools
Many duplicate finders work inside one account at a time. They are fine for tidying one cloud, but they cannot tell you that a file in Google Drive also exists in Dropbox. The cross-cloud part, which is the actual problem, is left to you.
Web-based cloud duplicate finders
Some online services let you connect a handful of popular clouds such as Google Drive, Dropbox, OneDrive and Box. Many of them let you scan for free but ask you to subscribe before you can delete anything, and the list of supported services is fairly short. If you use Mega, pCloud, Nextcloud, a NAS or an S3 bucket, you may be out of luck.
Downloading everything to your computer
Some guides suggest syncing every cloud to your PC and then running a local duplicate finder. That means huge downloads, lots of free disk space, hours of waiting, and the risk that deleting a file locally also deletes it in the cloud by accident.
Command line tools and scripts
Tools like rclone are powerful, but they expect you to write commands and read text output. That is a lot to ask from someone who only wants their storage back.
Doing it by hand
Opening each cloud in a browser and comparing folders works for ten files. It does not work for ten thousand.
What you really need is one app that connects to all your clouds, compares them together, shows you the matches clearly and lets you remove the extras safely. That is what Cloud Duplicate File Finder & Remover is built for.
Which clouds can you scan together?
In the Multiple Accounts mode, the connection list includes OneDrive, SharePoint, Dropbox, Mega, pCloud, Yandex Disk, Synology NAS, Nextcloud, Box, Google Drive, Amazon S3, Cloudflare R2 and Google Cloud Storage, and you can add more than one account of a service using the Add Account button. You can mix any of them in the same scan.
Some examples of what people compare:
| Scenario | Accounts in the scan |
|---|---|
| Personal and work storage | Google Drive and OneDrive |
| Team collaboration | OneDrive and SharePoint |
| Free storage accounts | Mega, pCloud and Google Drive |
| Two accounts of one service | Google Drive (personal) and Google Drive (work) |
| Developer and business storage | Amazon S3, Cloudflare R2 and Google Cloud Storage |
| Self-hosted and public cloud | Nextcloud, Synology NAS and Dropbox |
What you need before you start
- A Windows PC with Cloud Duplicate File Finder & Remover installed. You can download it from the Cloud Duplicate File Finder page.
- The login details of every cloud account you want to scan.
- Permission to delete files in those accounts. For work or shared accounts, check with your admin first.
- An internet connection.
Step by step: find and remove duplicates across multiple clouds
The screenshots below come from the actual application, so what you see on your screen should look the same.
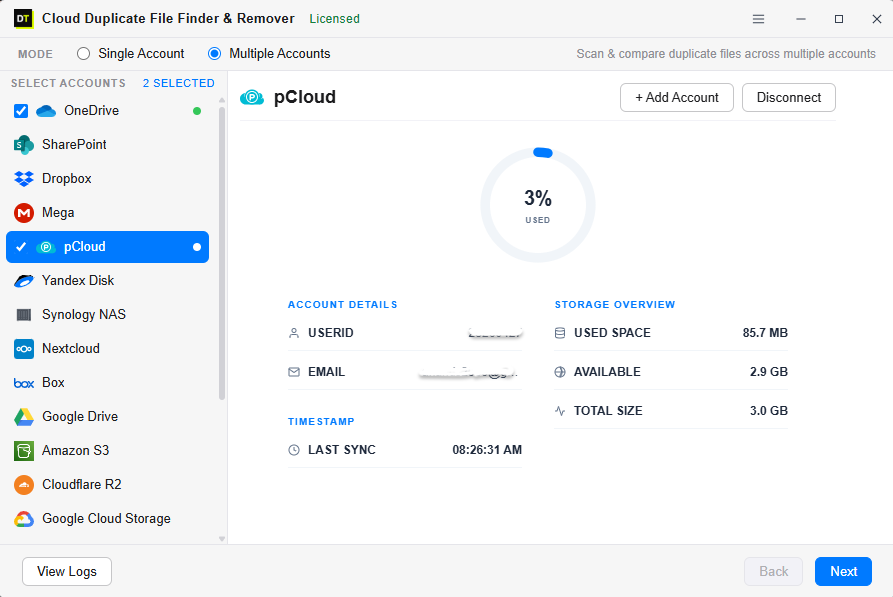
Step 1: Choose Multiple Accounts mode
Open Cloud Duplicate File Finder & Remover. At the top you will see a Mode selector with two options, Single Account and Multiple Accounts. Click Multiple Accounts. The note on the right says it will scan and compare duplicate files across multiple accounts, which is exactly what we want.
Single Account mode is for cleaning one cloud on its own. For everything in this guide, stay with Multiple Accounts.
Step 2: Connect your first cloud account
The list on the left shows every supported cloud. Click the one you want, for example OneDrive, then press the Connect button. A browser window opens and you sign in on the provider's own page, the same way you normally log in. You approve access, and you are connected.
The tool uses standard web sign-in for services like SharePoint, so your password is never typed into the tool itself. When the account is connected, a small green dot appears next to its name in the list.
Step 3: Connect the rest of your accounts
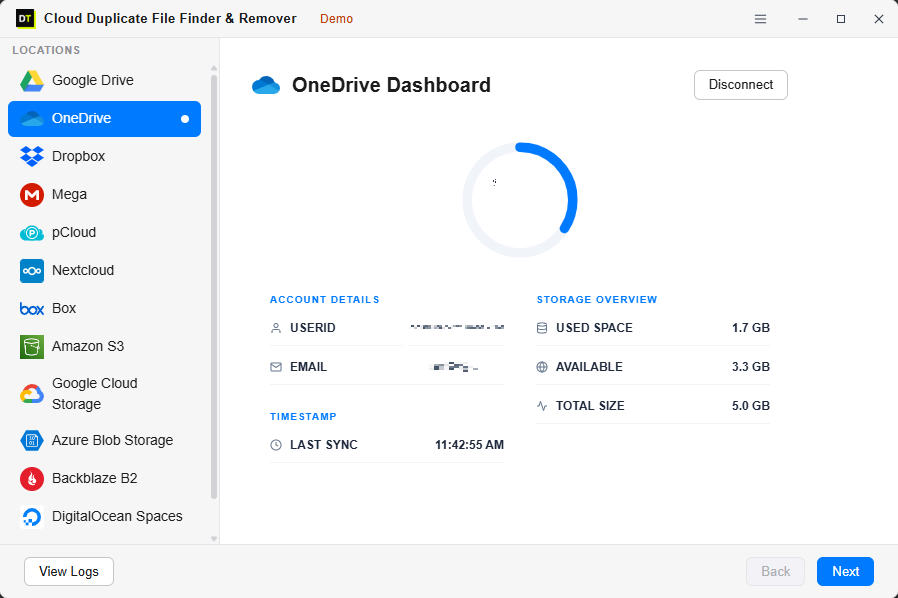
Repeat the same step for every other cloud you want to include. Click the service, press Connect, sign in, and wait for the green dot.
Have more than one account on the same service? Use the Add Account button at the top of the account screen to connect another one. This is how you scan two Google Drive accounts, or a personal and a work OneDrive, in the same run.
If you ever want to remove an account from the tool, the Disconnect button is right beside it.
Step 4: Tick the accounts you want to compare
Tick the checkbox beside each account you want in the scan. The heading above the list tells you how many are selected, for example "2 Selected." When you click on a connected account, the right side shows its details, including the email or user ID, used space, available space, total size and the time of the last sync.
This is a nice moment to look at how full each cloud is. It often explains which account you should clean first.
When all the right accounts are ticked, click Next.
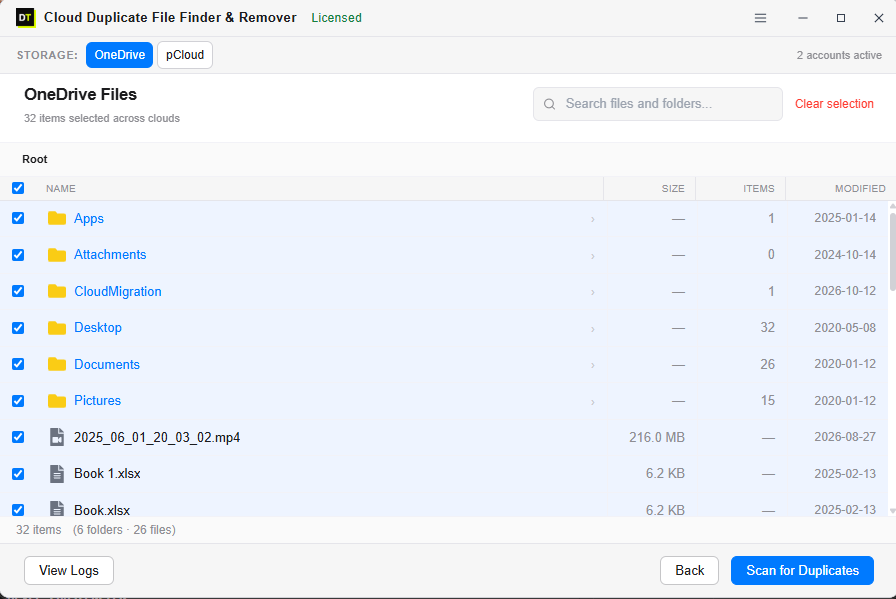
Step 5: Choose the folders to scan
The next screen lists your files and folders. Across the top is a Storage switcher with one button per selected account. Click each one to pick items in that account.
A few things to know.
- Everything in the root is selected by default, and a counter shows how many items are selected across all the clouds.
- Untick any folder you want to skip, or click the small arrow beside a folder to go inside and pick specific subfolders.
- The search box helps you find a folder quickly.
- Clear selection removes all the ticks so you can start from a short, careful list.
When you are happy with the selection, click Scan for Duplicates.
Step 6: Set your scan options
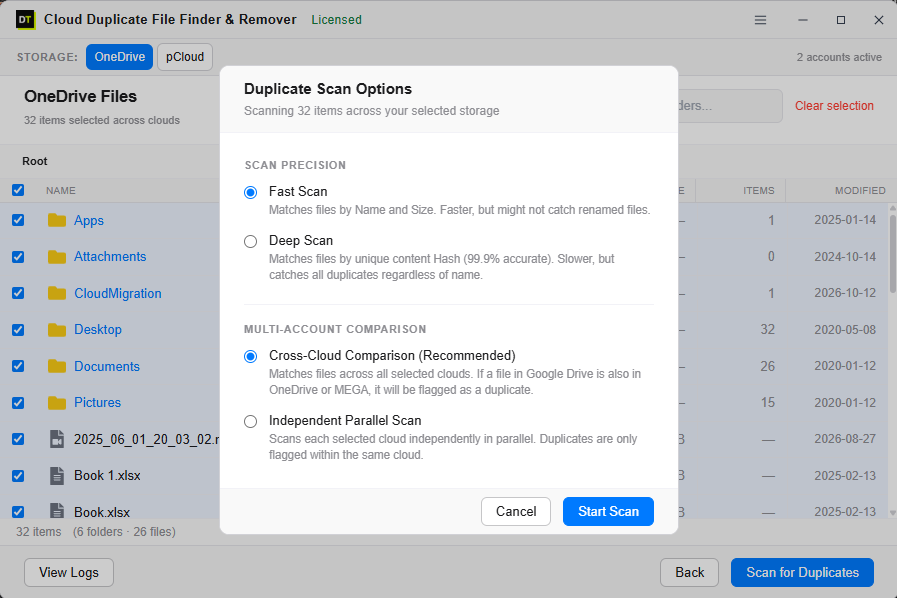
A window called Duplicate Scan Options opens. This is the heart of the whole process, so take a moment with it.
Scan Precision
- Fast Scan matches files by name and size. It is faster, but it might not catch renamed files.
- Deep Scan matches files by their unique content hash and is described as 99.9% accurate. It is slower, but it finds duplicates whatever they are called.
Multi-Account Comparison
- Cross-Cloud Comparison (Recommended) matches files across all the selected clouds. If a file in Google Drive is also in OneDrive or Mega, it is flagged as a duplicate.
- Independent Parallel Scan scans each cloud on its own, at the same time. Duplicates are flagged only inside the same cloud.
Step 7: Review the results and pick where to keep your data
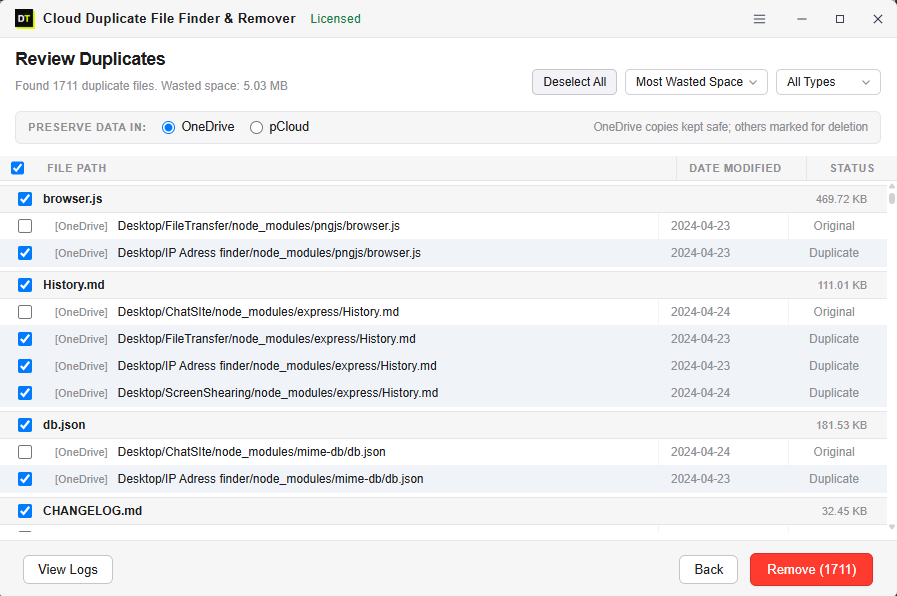
When the scan finishes, the Review Duplicates screen opens. The heading shows how many duplicate files were found and how much space they are wasting.
Here is how to read the screen.
- Matching files are grouped under one name, and the total size of the group is shown on the right.
- In every group, one copy is marked Original and left unticked. The other copies are marked Duplicate and ticked.
- Each line shows which cloud the file is in, its full path and its modified date.
- Most Wasted Space sorts the list so the biggest savings are at the top.
- All Types filters by file type, which is perfect if you only want to clean up videos or photos first.
- Deselect All clears every tick if you prefer to choose by hand.
Some ideas for choosing:
- Keep the cloud with the most free space or the best plan.
- Keep the cloud your team officially uses.
- Keep the account you will still have in a year, and clear out the one you plan to close.
Step 8: Remove the duplicates
When the list looks right, click the red Remove button at the bottom right. The number in brackets shows how many files will be removed. Confirm, let the tool finish, and your duplicates are gone.
Afterwards, check the recycle bin or trash in each cloud. Many providers keep deleted files there for a while, so your free space may not fully update until those are emptied.
Fast Scan or Deep Scan: which should you choose?
Choose Fast Scan when you want a quick first look, when files were copied without being renamed, or when you are scanning very large accounts and want the obvious duplicates out first. Plain copies usually keep their name and size, so Fast Scan finds most of them.
Choose Deep Scan when files may have been renamed, when you see lots of "copy" or "(1)" versions, or when you are about to delete a big batch and want maximum confidence. It checks what is inside each file, so renamed copies cannot hide.
My suggestion is to run Fast Scan first to see how big the problem is, then run Deep Scan on your most important folders before the final clean-up.
Cross-Cloud or Independent: which one when?
| Option | What it finds | Best for |
|---|---|---|
| Cross-Cloud Comparison | Files that exist in more than one selected cloud or account | Cleaning up after migrations, merging several accounts, keeping one master copy |
| Independent Parallel Scan | Duplicates inside each cloud on its own | Tidying every account separately |
Smart habits to stop duplicates coming back
- Give every cloud a job. For example, documents in OneDrive, photos in Google Drive, archives in Mega. Write it down so you stop guessing.
- Switch off overlapping backups. If two apps back up your phone photos, turn one off.
- Move, do not copy. When you shift files from one cloud to another, delete the source after checking.
- Close accounts you no longer use. Clean first, then close.
- Scan every few months. A short scan now saves a long clean-up later.
Frequently asked questions
Can I find duplicate files across different cloud storage services at once?
Yes. Connect all the accounts in Multiple Accounts mode, choose Cross-Cloud Comparison, and run a single scan. Files that exist in more than one cloud are flagged as duplicates.
Can I scan multiple accounts of the same cloud?
Yes. Use the Add Account button to connect more than one account of the same service, such as two Google Drive accounts or a personal and work OneDrive, and include them in the same scan.
Do I have to download my cloud files to my computer?
No. You connect your accounts to the tool and run the scan from there. There is no need to sync every cloud to your PC first.
Will it delete the original files too?
No. In each group of matching files, one copy is marked Original and left unticked. Only the copies marked Duplicate are selected for removal, and you can review and change the selection before pressing Remove.
Can I choose which cloud keeps the files?
Yes. The Preserve Data In option on the Review Duplicates screen lets you choose the cloud that keeps its copies. Matching files in the other clouds are marked for deletion.
Does it find renamed duplicates?
Yes, with Deep Scan. It compares files by their unique content hash, so a renamed copy is still recognised. Fast Scan only compares name and size.
Can I scan only certain folders?
Yes. On the folder selection screen you can untick folders, go inside folders to choose subfolders, search for a folder, or clear the selection and start again.
Is it safe to connect my accounts?
The tool uses the standard web sign-in of each provider where available. You log in on the provider's own page and approve access, and you can disconnect any account from the tool at any time.
Does it work on Mac?
Cloud Duplicate File Finder & Remover is a Windows application, so you run it on a Windows PC.
Final thoughts
Using several clouds is perfectly normal, and so is ending up with the same file in more than one of them. What matters is not letting it pile up forever.
You can compare folders by hand, download everything to your computer, or write scripts. Or you can connect all your accounts to one tool, run a single Cross-Cloud scan, choose which account keeps the data, review the list and press Remove. It takes minutes, not weekends.
Ready to get your storage back? Download Cloud Duplicate File Finder & Remover from the Data TB Software product page and run your first multi-cloud scan today.