
How to Find and Remove Duplicate Files on Windows - Complete Step-by-Step Guide
No PowerShell. No manual sorting. Every step shown exactly as it appears on screen.
Your Windows PC is running low on storage - and you're not sure why.
You haven't downloaded anything unusually large recently. You haven't installed major software. But the storage keeps filling up, the warnings keep appearing, and the free space keeps shrinking.
Duplicate files are usually why.
The average Windows PC has between 15% and 30% of its storage occupied by files that already exist somewhere else on the same drive - under a different name, in a different folder, created by a backup that ran twice, or synced from a phone that already had its photos imported. Files you don't know you have twice.
This guide shows you exactly how to find and remove them - every step shown as it actually appears on screen.
Before You Start - What Windows Can and Can't Do on Its Own
Windows 10 and 11 don't have a built-in duplicate file finder.
Storage Sense cleans up temporary files and old Recycle Bin contents. Disk Cleanup handles system junk. Neither one detects or removes duplicate user files - photos, documents, videos, project folders, or anything else you've saved yourself.
Windows 10 and 11 do not provide a built-in dedicated duplicate filter software - you need a dedicated tool that compares files by their actual content, not just by name.
This guide uses DT Disk Duplicate Finder, which runs a complete scan for free and shows you every duplicate before removing anything.
Download it here before starting: DT Disk Duplicate Finder
No sign-up. No account. Install and open.
Step 1 - Check Your Storage Dashboard First
When you open DT Disk Duplicate Finder, the first thing you see is not a scan prompt - it's a complete picture of your current storage.
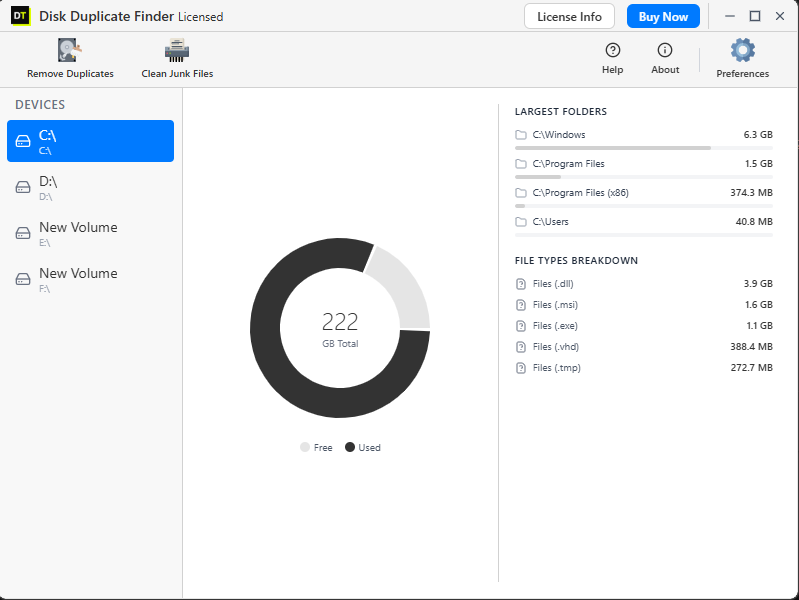
On the left side, every drive connected to your PC is listed under Devices - your main C: drive, any additional volumes, external drives. Click the one you want to work on.
The center shows a donut chart of your total drive capacity - how much is used versus free. In the screenshot above, the drive is 222GB total with a significant portion already occupied.
On the right, two sections give you the context you need before scanning:
- Largest Folders - which directories are consuming the most space. In this example,
C:\Windowsis using 6.3GB,C:\Program Files1.5GB. This tells you where to look first. - File Types Breakdown - which file categories are taking the most room. DLL files at 3.9GB, MSI installers at 1.6GB, EXE files at 1.1GB - all shown clearly before a single scan runs.
Step 2 - Protect Folders You Don't Want Scanned
Before running any scan, add the folders you want to skip.
This step is optional - but important. System folders like C:\Windows and C:\Program Files contain files that may look like duplicates but serve different purposes. Scanning them is unnecessary and can add confusion to your results.
Go to Preferences in the top right corner of the app.
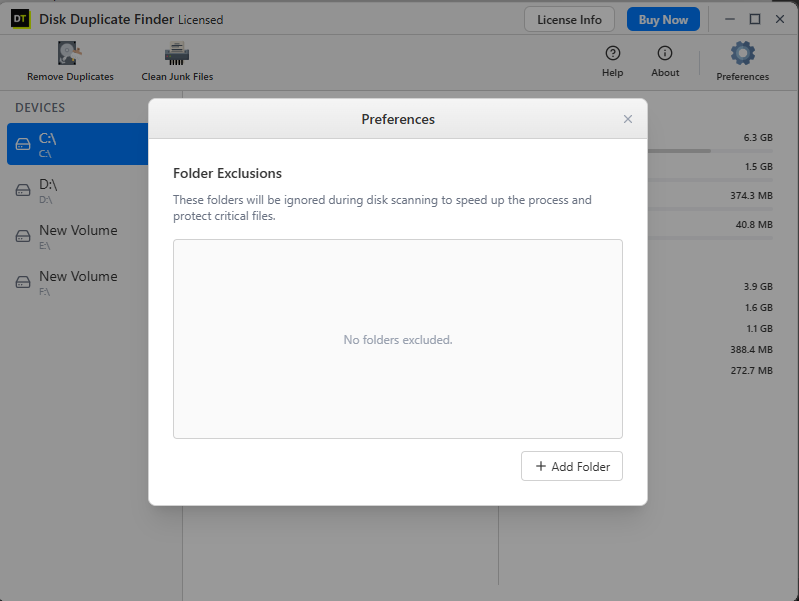
The Preferences window opens to Folder Exclusions. Click + Add Folder and select any folder you want permanently protected from scans.
Once a folder is in this list, it's skipped on every future scan automatically - you don't need to re-configure it each time. Good candidates to exclude:
C:\WindowsC:\Program FilesC:\Program Files (x86)- Any active project folder you don't want touched
Close Preferences when done. Your excluded folders are saved permanently.
Step 3 - Run the Duplicate Scan
Now the actual scan.
On the left panel, you'll see File Types - a set of category buttons that control what gets included:
- All Files - everything on the drive
- Documents - DOCX, PDF, XLSX, and more
- Images - JPG, PNG, HEIC, RAW formats
- Videos - MP4, MOV, AVI, MKV, and more
- Audio - MP3, WAV, FLAC, AAC
- Archives - ZIP, RAR, 7Z, ISO
- Databases - SQL, DB, SQLite
- Executables - EXE, MSI, DLL
- Emails - PST, EML, MSG, MBOX
- Developer - source code, config files, build outputs
- Other - everything else
Click Start Scan.
The tool reads every file in your selected scope, computes a content hash for each one, and groups identical hashes together. Real-time progress shows the file count and duplicate groups found as the scan runs.
Step 4 - Review Your Results
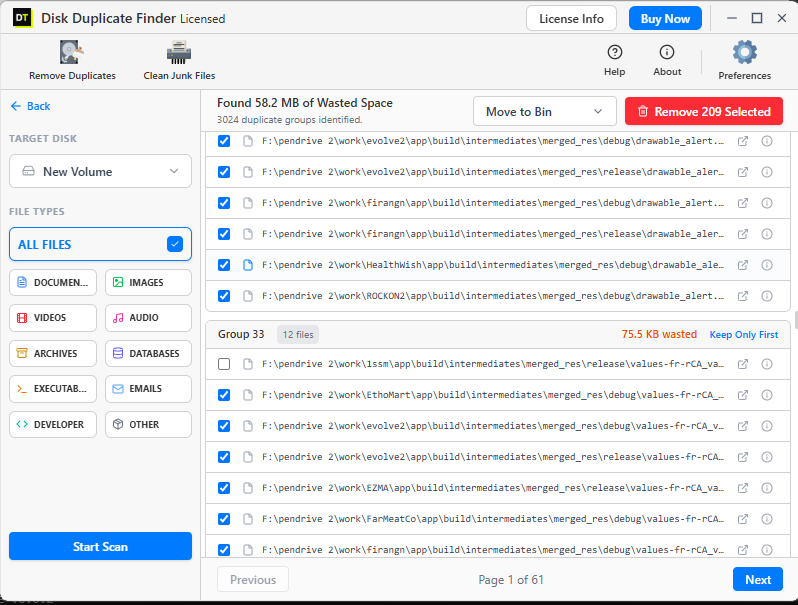
When the scan completes, results appear in the main panel.
At the top: Found 58.2 MB of Wasted Space - 3024 duplicate groups identified.
That's 3,024 groups of identical files - each group containing two or more copies of the same file content - accounting for 58.2MB of storage that could be recovered on this particular scan.
Each group shows:
- Group number and file count - "Group 33 - 12 files" means 12 identical copies of the same file exist on this drive.
- Storage wasted - "75.5 KB wasted" shown in orange, so you immediately know how much space this group is consuming unnecessarily.
- Keep Only First - a one-click shortcut that selects all copies except the first one for removal. For obvious duplicate groups, this handles the cleanup in one click.
- Individual file paths - every copy's full location is shown.
F:\pendrive 2\work\evolve2\app\build\intermediates\merged_res\debug\drawable_alert...- you know exactly where each copy lives before deciding anything.
A few tips for reviewing results:
- Tackle the largest wasted-space groups first. They're shown with the storage figure in orange - sort by size to put the biggest recoveries at the top.
- Use "Keep Only First" for obvious groups. If you see 12 identical build output files from different project folders - they're clearly duplicates. One click selects 11 for removal.
- Review manually for anything you're unsure about. If a group contains files from a location that isn't obviously redundant - check the paths carefully before selecting.
Step 5 - Choose How to Remove Them
Once you've selected what to remove, the removal dropdown at the top gives you three options:
- Move to Bin - files go to the Windows Recycle Bin. Fully recoverable. If you open the Recycle Bin and click Restore, the file comes back exactly where it was. This is the right choice for any cleanup where you're not 100% certain.
- Move to Folder - files move to a folder you specify for manual review. Useful when you want to check files before committing to deletion. Review the folder, confirm everything looks right, then empty it.
- Permanent Delete - files are immediately removed without going to the Recycle Bin. Use only when you're completely certain - permanent deletion is not recoverable through standard means.
Click Remove Selected when you're ready. The duplicates are removed according to the method you chose.
Step 6 - Clean Junk Files While You're Here
Duplicate files aren't the only thing silently filling your drive.
Temporary files accumulate every time you browse the web, open applications, or run Windows Update. System caches build up in the background. Empty folders left behind by uninstalled software add clutter without consuming significant storage on their own.
From the top toolbar, click Clean Junk Files.
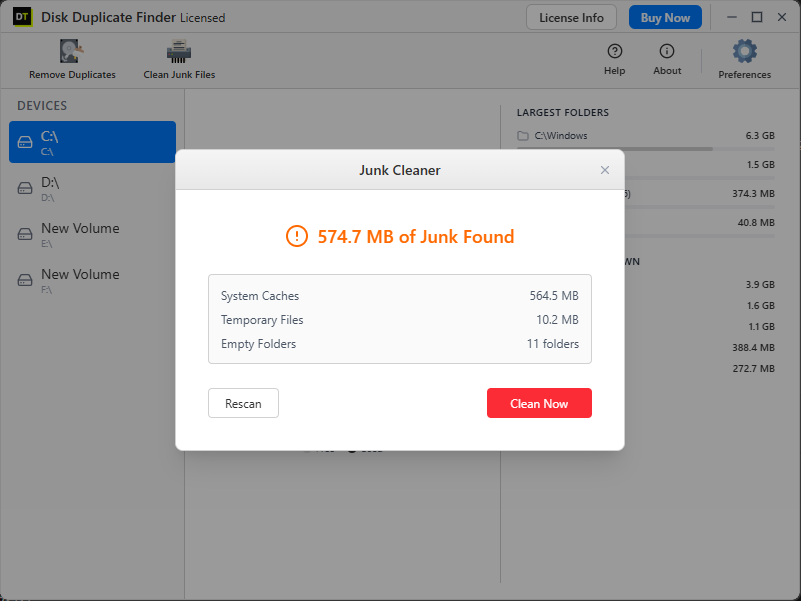
The Junk Cleaner scans and shows you exactly what it found:
- System Caches - 564.5 MB
- Temporary Files - 10.2 MB
- Empty Folders - 11 folders
Nothing is cleaned automatically. Review the numbers. Click Clean Now when ready. Click Rescan if you want to run the scan again to confirm.
The junk cleaner works completely in both the free and full version - no purchase required to use it.
The Right-Click Shortcut - For Everyday Use
The steps above cover a full drive scan. But for day-to-day use - checking a specific folder before clearing it out, scanning a Downloads folder before a cleanup - there's a faster way.
Once DT Disk Duplicate Finder is installed, right-click any folder in Windows Explorer.
You'll see "Scan for Duplicate Files" in the context menu.
Click it. The tool opens and immediately starts scanning that specific folder - no navigating through the app, no pointing the tool at the right location. One right-click and the scan is already running on exactly the folder you wanted.
This is particularly useful for:
- Downloads folder - right-click before clearing it out. See what's duplicated before manually going through files.
- Project folders - right-click before handing off a project. Confirm there are no redundant copies before the final version goes out.
- Photo backup folders - right-click after importing from your phone. Catch any duplicates that came in with this import before they accumulate.
How Much Storage Will You Get Back?
It depends on your PC and how you use it - but the patterns are consistent.
Users who frequently download files, import photos from a phone, or copy project folders typically reclaim 10–20% of their drive in the first scan. On a 500GB drive, that's 50–100GB.
Video files produce the most dramatic single-group recoveries - a duplicate 4K video or video project folder can account for 10–30GB alone.
The free scan shows you the exact number for your specific drive - every group, every wasted byte - before you remove anything or spend anything.
Frequently Asked Questions
Does Windows 10 or 11 have a built-in duplicate file finder?
Is the free version actually useful or just a teaser?
What does "content-based hash matching" mean in plain English?
Will removing duplicates break any of my software?
C:\Windows and C:\Program Files using the Folder Exclusions feature. User files - photos, documents, videos, project files, downloads - are safe to deduplicate. The Recycle Bin option gives you a recovery path if anything looks wrong after removal.How long does a full drive scan take?
Can I scan an external hard drive or USB drive?
Summary - What You Did in Six Steps
- Step 1 - Opened the storage dashboard to understand where space is going.
- Step 2 - Added folder exclusions to protect system and critical folders.
- Step 3 - Ran the duplicate scan across your chosen file categories.
- Step 4 - Reviewed results group by group before removing anything.
- Step 5 - Removed duplicates to Recycle Bin for safe, recoverable cleanup.
- Step 6 - Ran the junk cleaner to clear caches, temp files, and empty folders.
→ Download DT Disk Duplicate Finder - Free Scan
User Reviews
"Clear step-by-step guide. The Recycle Bin default option makes cleanup totally safe."
"Used 'Keep Only First' to clear 65GB of duplicate build files in under 5 minutes."