
Here is how this usually starts. A project team has been keeping its files in one person's OneDrive for two years. That person is leaving, or the project just got bigger, or someone in IT finally said the words "we need this in a proper team site." Now you have 40 GB of folders, a pile of sharing links that nobody remembers creating, and a very simple instruction: move it to SharePoint, and do not lose anything.
That last part is where most guides get slippery. "Do not lose anything" sounds like one requirement, but it is really four different ones: the files themselves, their version history, their metadata (dates, authors, columns), and who is allowed to open them. Each of those behaves differently when you move from OneDrive to SharePoint, and no single method keeps all four exactly as they were.
This guide tells you what really carries over with each method, what does not, why permissions deserve a different approach from the rest, and how to run the migration so that nobody opens a folder on Monday morning and finds a mess.
Quick answer: For a small amount of data, open OneDrive in your browser, select the files, and use Move to (not Copy to) to send them to the SharePoint library. Move to keeps version history. For larger or repeated migrations, use a migration tool that works directly between the two clouds and can carry version history, then rebuild access at the destination with SharePoint groups instead of trying to copy personal sharing one item at a time. No simple method copies OneDrive permissions one for one into SharePoint, and you usually would not want it to.
First, Decide What You Actually Need to Keep
Before choosing a method, be clear about what "without losing anything" means for this particular job. Here is the full list, with a plain description of how each item behaves.
| What | What it is | Does it come across? |
|---|---|---|
| Files and folder structure | The content itself and how it is organised | Yes, with every sensible method |
| Version history | Earlier versions of each file | Move to keeps it. Copy to does not. Tools differ, so check |
| Created and modified dates, authors | Basic system metadata | Move to keeps them. A fresh copy gets a new created date. Tools differ |
| Custom columns and managed metadata | Extra tags added in SharePoint libraries | Kept on Move to when the same term store is used. Not for managed metadata otherwise |
| Permissions | Who can open, edit or share each item | Not copied. Files take the permissions of the destination |
| Sharing links | Links sent to people inside and outside the company | Do not assume they keep working. Test, and plan to re-share |
Why Permissions Do Not Simply "Move Across"
It helps to understand why this is the case, because it changes what a good plan looks like.
OneDrive is personal. Every file belongs to one person. Access works through that person sharing individual files and folders with other people, through links, or through direct invitations. Over two years, that creates dozens of different little access arrangements.
SharePoint is organised around sites and groups. A site has Owners, Members and Visitors. A document library inherits the site's permissions, and folders and files inherit from the library. Access is meant to be managed in one place, for the whole library, by group membership.
This is the real reason Microsoft's own tools and community answers keep saying the same thing: whether you use Move to or Copy to, neither action carries file permissions, and the files simply take on the permissions of the library they land in.
It is also why a perfect one to one permission copy is rarely a good idea even when a tool offers it. If you recreate every personal sharing arrangement as unique permissions on individual files, you end up with a library full of exceptions. Those are hard to audit, slow to manage, and a common source of "why can this person see that?" questions a year later. Microsoft advises keeping unique permissions to a minimum for exactly this reason.
A better way to think about it: the migration moves the content, and a short, deliberate step afterwards sets who can see it, using groups. We will cover that step in detail below.
Your Migration Options Compared
Here is what each realistic approach does with the things you care about.
| Method | Best for | Version history | Dates and authors | Permissions | Effort |
|---|---|---|---|---|---|
| Move to, in the browser | A few folders, one person | Kept | Kept | Take the destination's | Low |
| Copy to, in the browser | Keeping the source as it is | Latest version only | New created date | Take the destination's | Low |
| Drag and drop with the sync app or File Explorer | Small, quick jobs | Often not carried | Often reset | Take the destination's | Medium, because files are downloaded and uploaded again |
| Direct cloud to cloud migration tool | Large folders, many users, repeated runs | Optional in the tool | Check on a pilot | Set at the destination | Low to medium |
| Enterprise migration suite | Projects that must carry item level permissions | Yes | Yes | Mapped item by item | High, and priced accordingly |
Before You Move Anything: The Planning Checklist
Most migration trouble is decided before the first file moves. Spend an hour on this and the rest of the job is dull, which is exactly what you want.
1. Take a size and count inventory. How many gigabytes, how many files, how many folders. This tells you whether the browser is enough or whether you need a tool. 2. Find the awkward items. Sort by size and look at the top of the list. Look for the deepest folder paths. Look for odd file names. SharePoint Online has limits on path length, file size and certain characters in names, and these are the most common reasons individual items fail in any migration. Check Microsoft's current limits for your tenant, because they change over time. 3. Decide where each thing will live. Do not move a whole personal folder into one giant library because it is easy. Decide which site and which library each group of files belongs in. Moving into a clear structure now saves a reorganisation later. 4. Write down who needs access to what. Open the Manage access panel on the top level folders and note who has access. Also note anything shared with people outside the company. You are not copying this list into SharePoint. You are using it to build the right groups at the destination. 5. Clean up first. Duplicates are the easiest thing to fix before a migration and the most annoying to fix after one. If a folder has three copies of the same report, move one. DT SharePoint Duplicate Finder, OneDrive Duplicate Finder and Cloud Duplicate File Finder work directly on your cloud accounts. 6. Check you are allowed to move it. For business data, make sure the owner or your organisation has approved the move. Some Microsoft 365 organisations also need an administrator to approve a new app before it can sign in. If yours does, that is a one time step. 7. Plan a pilot. One representative folder, a few hundred files, with different file types. You will run it first, check it carefully, and learn everything you need to know about the full run for the price of ten minutes.
Method 1: Move to (Free, Best for Small Jobs)
This is the simplest way to move files from OneDrive to SharePoint, and it is built into Microsoft 365. It works inside the browser, within your own tenant, and nothing is downloaded to your computer.
1. Open OneDrive in your browser and go to the folder you want to move. 2. Select the files or folders. You can select several at once. 3. Choose Move to from the toolbar. 4. In the list on the left, choose the SharePoint site, then the document library and folder. 5. Select Move here. 6. Open the destination and check that the files, folders and version history are all there.
What you gain
The history of each document goes with it, and the file keeps its original created and modified details. Metadata columns are kept as long as the same term store is used at both ends. Managed metadata values are not kept if they are not.What to know
- The file is removed from OneDrive after the move, so there is no safety copy unless you made one.
- Permissions do not travel. The files take the permissions of the destination library.
- The browser is meant for modest amounts. It is not designed for tens of thousands of files or for repeated, scheduled runs.
- Do not move OneNote notebooks outside the OneNote app.
Method 2: Drag and Drop with the Sync App (Not Recommended)
It is tempting to sync the SharePoint library to your computer and drag folders across in File Explorer. It works for a handful of files, but it is the weakest option for a real migration. Everything is downloaded to your PC, then uploaded again, so it is slow and fragile on large folders, a closed laptop can interrupt it, and version history typically stays behind. If you have more than a few gigabytes, skip it.
Method 3: A Direct Cloud to Cloud Migration Tool
When the job is bigger than a browser can comfortably handle, such as a whole department, many users' OneDrives, or a project you want to run in several passes, a dedicated tool is the sensible step. The value is not magic. It is that the tool does the repetitive parts reliably: previewing, filtering, mapping, resuming and reporting.
The steps below use DT SharePoint Migration Tool, a Windows application that moves files directly between clouds, so nothing is downloaded to your PC. It uses an eight screen workflow, and the same screens apply whichever cloud sits on either side.
Step 1: Start a job from the Dashboard
Install the tool, open it and start a new migration job. Everything is job based, so one job can carry several accounts, drives or sites at once.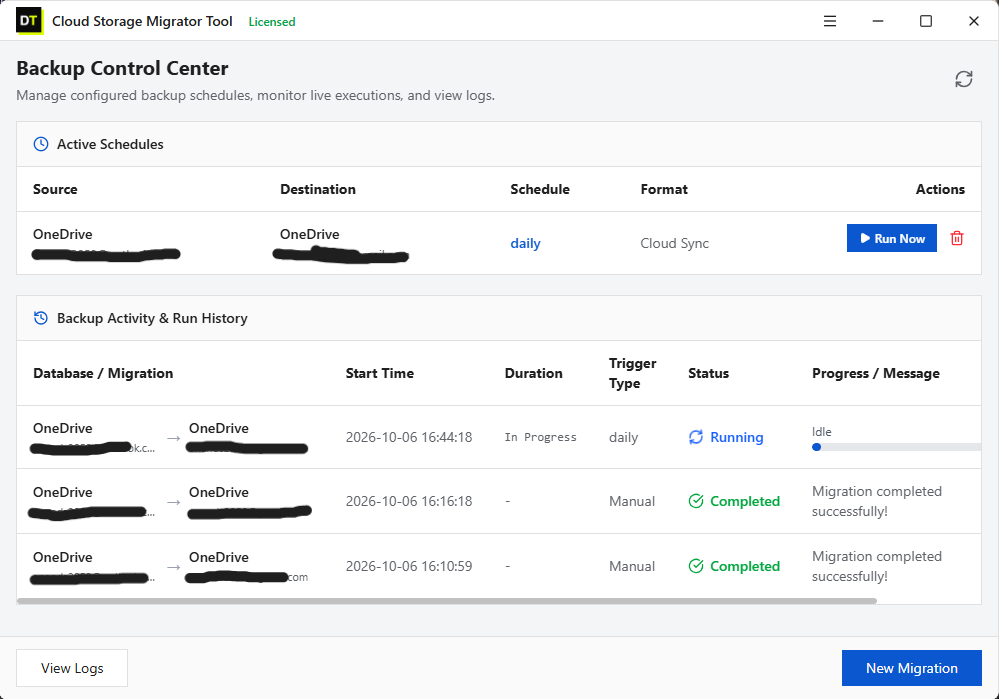
Step 2: Choose the mode
Pick personal or business mode. For company data, use business mode. The tool offers cross migration for moving between different platforms, and same migration for moving within one platform, such as SharePoint to SharePoint. Choose the one that fits your accounts.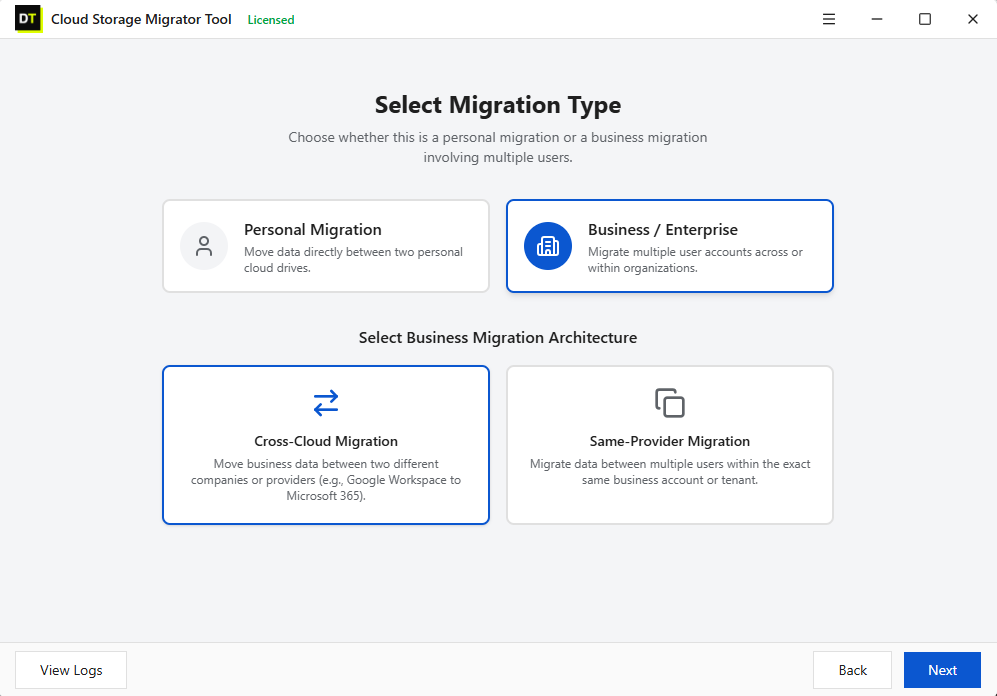
Step 3: Sign in to the source
Select OneDrive as the source and sign in on Microsoft's own secure sign in page. Multi-factor authentication works where Microsoft supports it, and your password is not typed into or stored by the tool. You can add more source accounts if the job covers several people.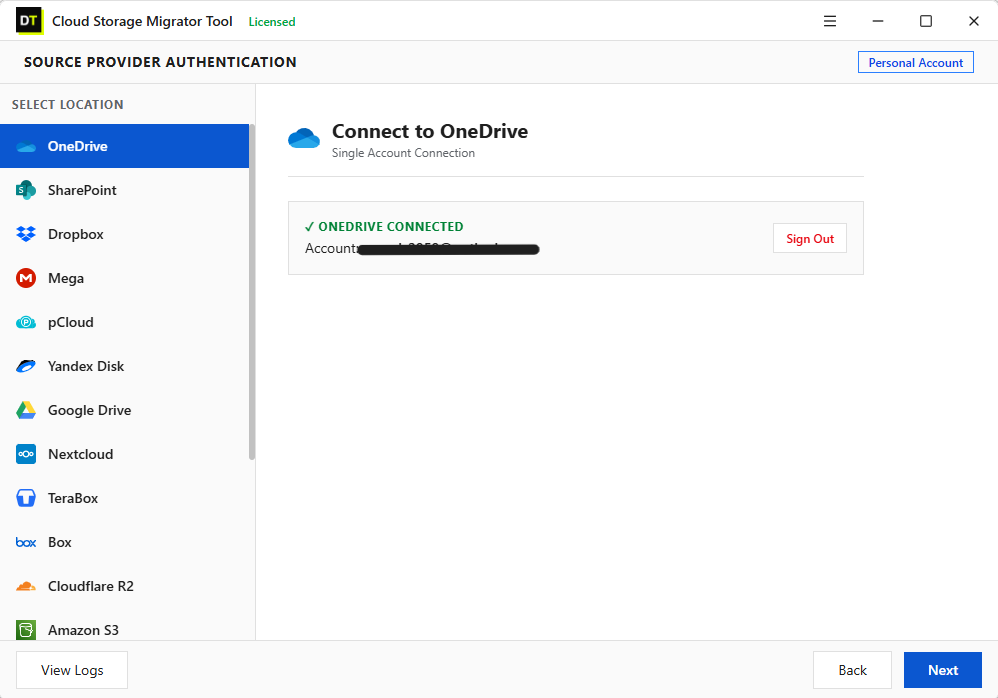
Step 4: Preview before anything moves
Browse the full folder tree with sizes and dates, then narrow the scope by file extension, date range, folder type or file size. Nothing is committed on this screen. It is the best time to leave out old temporary files and obvious clutter.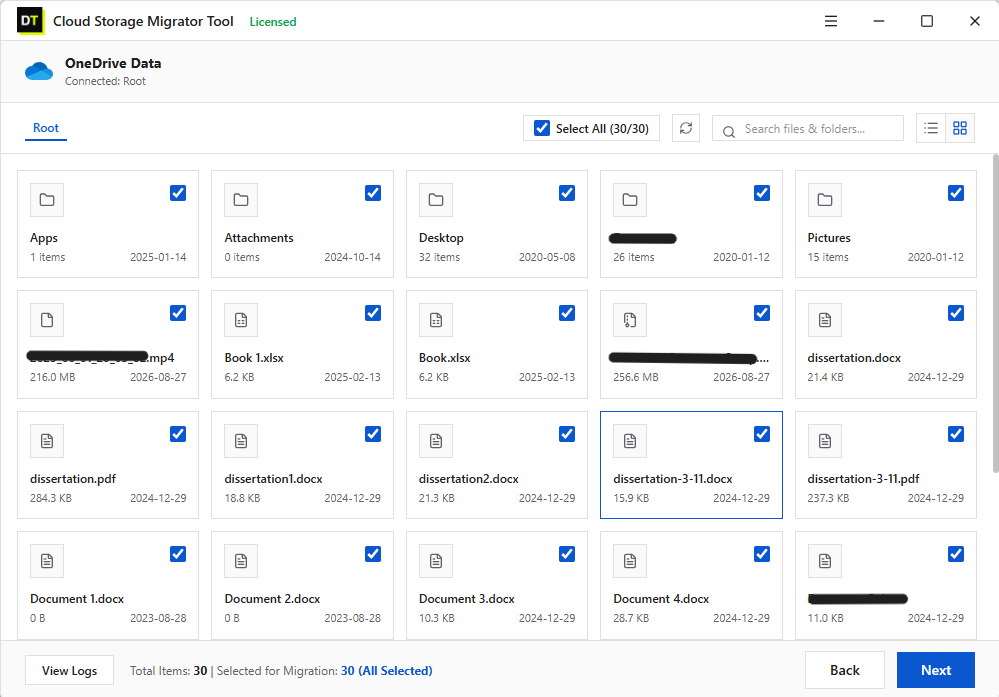
Step 5: Sign in to the destination
Choose SharePoint as the destination and sign in the same way. You can browse the existing structure first, so you know exactly which site and library will receive the files.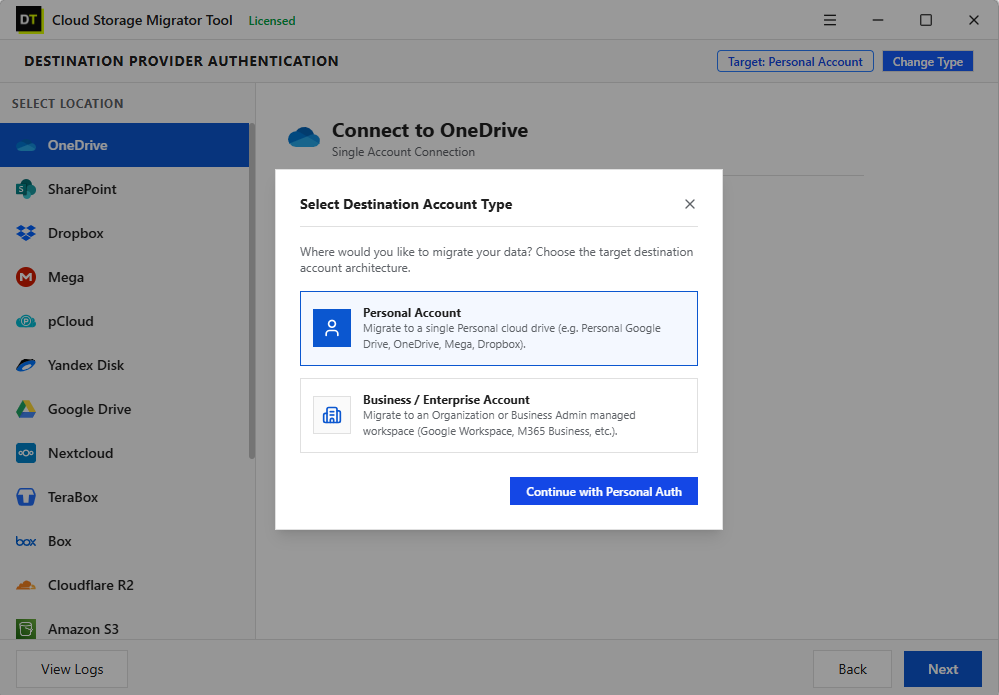
Step 6: Map source to destination
For a small job, map folders or accounts manually in a few clicks. For a larger one, upload a CSV and map many accounts or libraries in one step. A move that would be hundreds of manual selections becomes one file.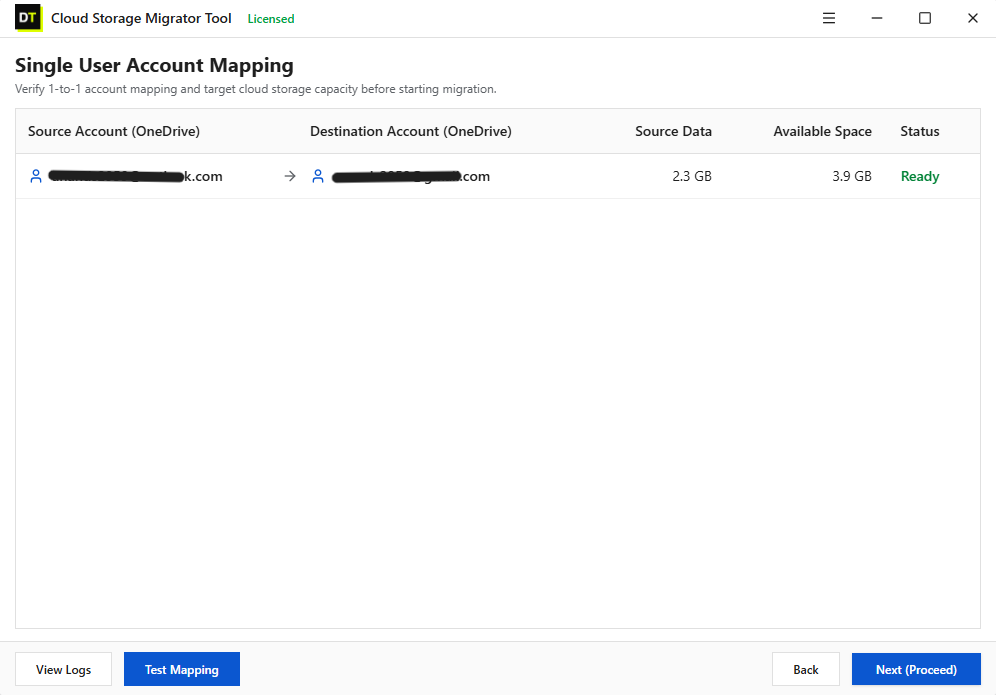
Step 7: Configure the rules
Decide what happens if a file already exists at the destination: skip it, rename the incoming copy so both exist, or replace the existing file. Switch on version migration if you want file history to move with the current version. Choose a one time run, an incremental run (only new or changed files), or a schedule. You can also tune thread counts to suit your internet connection.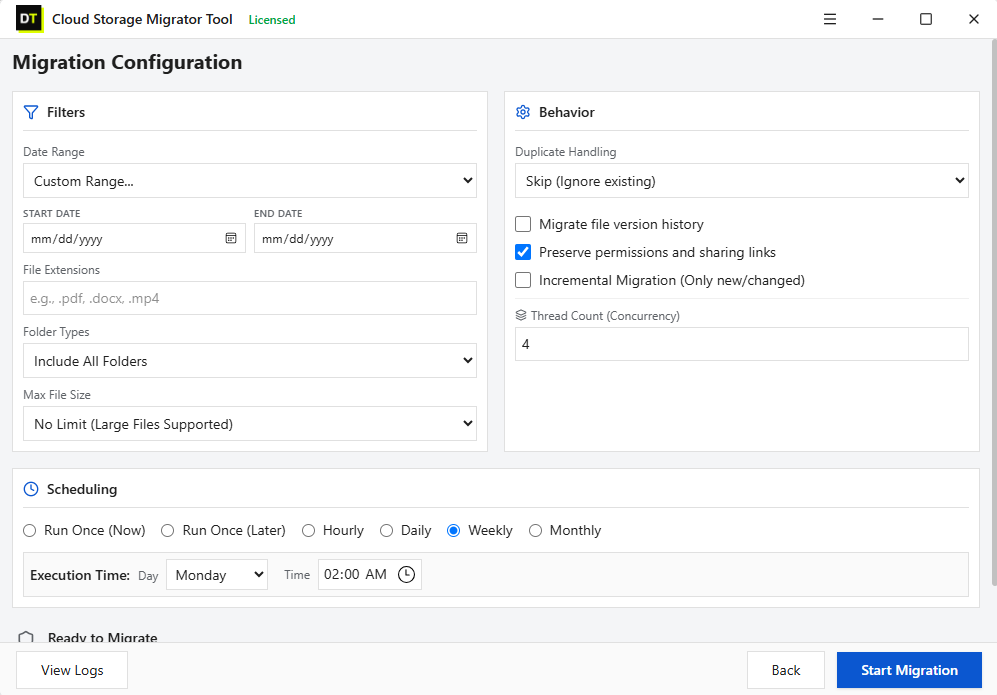
Step 8: Run, watch and read the report
The job runs directly between the two clouds, with the original folder structure preserved. If your connection drops or you pause, it resumes where it stopped. When it finishes, the report lists failed items, filtered items and already migrated items, and can be exported for your records.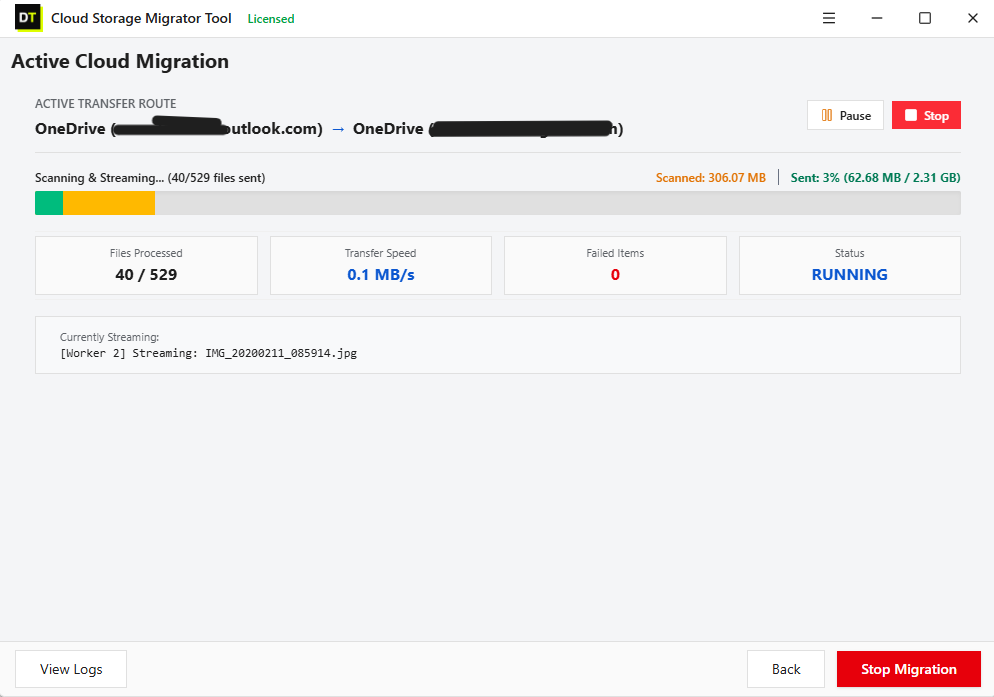 The free trial processes up to 500 MB, with files under 20 MB, so you can try the whole workflow on a real pilot folder before buying. The licensed version has no data size limit.
An honest note on scope: DT SharePoint Migration Tool is a content migration tool for libraries and drives. It moves files and folders, with version history if you enable it. It does not move permissions, and it does not recreate site pages, web parts, workflows or list structures. That is a deliberate fit for the plan in this guide: move the content, then set access properly at the destination.
Method 4: An Enterprise Migration Suite (Only If You Truly Need Item Level Permissions)
There are premium migration suites that can read permissions on the source and map them onto the destination, user by user and item by item. If you work in a regulated environment, or you have a legal reason to reproduce exact access on every file, this is the category to look at. Expect a larger budget, a longer project and a planned permission mapping exercise, because you still need to decide what each source user maps to in the new tenant or site.
For most teams moving a department's or a person's OneDrive into a team site, this is more than the job needs.
The Permissions Step Everyone Skips: Rebuild Access at the Destination
This is the step that makes the migration feel finished. After the files arrive, set up access like this:
- Use the site's groups. Add the right people to Owners, Members or Visitors on the SharePoint site. They get access to the whole library, and to everything inside it, automatically.
- Create a separate library if one group of files needs a smaller audience. A library with its own permissions is easier to manage than hundreds of files with their own.
- Use unique permissions on folders only when you must, and keep a short note of why.
- Handle external guests deliberately. Anyone outside your company who had a link to the old OneDrive files needs to be invited again from the new location, if they still need access.
- Test with a real user. Sign in as, or ask, someone from each audience and confirm they can open what they should, and cannot open what they should not.
- Tell people. Send a short message with the new location, so nobody goes looking in OneDrive.
Special Case: Moving a Departing Employee's OneDrive
This is one of the most common reasons for this migration, so it deserves its own section.
When a user account is deleted, Microsoft 365 keeps the person's OneDrive for a retention period before it is deleted for good. The default is 30 days, and administrators can change it. Within that window an administrator can give the manager or another user access to the departed person's OneDrive, and from there the useful files can be moved into a team library.
A few practical tips:
- Do not wait until the last day of the retention period. Start on day one.
- Move only the business files. Personal files, if any, are a separate conversation.
- Use a filtered preview to leave out old downloads and temporary files.
- Check the retention period in your organisation, because it may differ from the default.
How to Verify the Migration (Do Not Skip This)
After the run, verify before you delete anything from the source:
1. Compare counts and sizes. Source and destination should match, except for items you deliberately filtered out or that failed. 2. Read the report. Look at the failed items first. The usual causes are very long paths, characters SharePoint does not accept in names, and files above the maximum size. Fix the names or paths and run again. 3. Open a sample. Pick ten files from different folders and open each. Check one very old file and one very large one. 4. Check version history. Open the version history on a few files that you know had several versions. 5. Check dates and authors. Compare created and modified details against the source on your pilot files. Different methods treat these differently, and it is much better to find out on the pilot than after the full run. 6. Test access. Confirm the right people can open the right folders. 7. Keep the source until people confirm. Keep the original for a few weeks, or set it to read only. Disk is cheap, and lost work is not.
Keep SharePoint Current Until Cutover Day
A real migration takes longer than one afternoon, and people keep working in OneDrive while you plan. A good pattern is to run a full first pass, then run incremental passes that move only new or changed files, daily or weekly. On cutover day, the last run is small and quick, and you can then set the old location to read only.
Common Mistakes to Avoid
- Using Copy to when you needed Move to. Copy to brings only the latest version.
- Assuming permissions came across. They did not. Plan and set them.
- Moving everything into one big library. Decide the structure first.
- Skipping the pilot. Ten minutes on a small folder saves hours.
- Ignoring long paths and odd file names. They are the most common cause of failed items.
- Migrating clutter. Clean duplicates and old files before moving.
- Deleting the source too early. Verify, then wait for confirmation.
- Forgetting external guests. Their old links may not work in the new location.
- Not telling users. The best migration still fails if people go to the old place.
Frequently Asked Questions
Can I move files from OneDrive to SharePoint?
Yes. For small amounts, open OneDrive in your browser, select the files and choose Move to, then pick the SharePoint library. For larger migrations, use a cloud to cloud migration tool.Does moving files from OneDrive to SharePoint keep permissions?
No. Neither Move to nor Copy to carries file permissions. The files take the permissions of the SharePoint library they land in, so you set access at the destination, ideally through the site's groups.Does it keep version history?
Move to keeps the version history. Copy to copies only the latest version. Migration tools differ, so choose one that lets you migrate versions and test it on a pilot folder.Is metadata preserved when I move files to SharePoint?
Basic details such as the created and modified dates stay with Move to, and custom column values are kept when the same term store is used at both ends. Managed metadata values are not kept if the term store differs. A copy is treated as a new file with a new created date.What is the difference between Move to and Copy to?
Move to relocates the file, along with its version history, and removes it from the source. Copy to leaves the original in place and creates a new file at the destination with only the latest version.Can I use the SharePoint Migration Tool (SPMT) to move OneDrive to SharePoint?
SPMT is built for file shares and SharePoint Server as the source. It is not designed to take data out of OneDrive. For a OneDrive source, use the browser for small jobs or a cloud to cloud tool for larger ones.How do I migrate many users' OneDrives to SharePoint at once?
Use a tool with job based processing and CSV mapping, so you can map many accounts or libraries in one step, and run the migration in passes with scheduled, incremental runs.Can I move a former employee's OneDrive to SharePoint?
Yes, within the retention period. An administrator grants access to the departed person's OneDrive, and the business files can then be moved into a team library. The default retention period is 30 days, but check your own setting.Is there a size limit for OneDrive to SharePoint migration?
The browser is meant for modest amounts, and Copy to has a 500 MB limit at a time. SharePoint itself has limits on file size, path length and the number of items per library, so check Microsoft's current limits. The licensed version of DT SharePoint Migration Tool puts no limit on total data or single file size.Will my sharing links still work after the move?
Do not assume so. Test a few important links after the pilot, and plan to share again from the new location, especially for external guests.Why did some files fail to migrate?
The usual reasons are very long paths, characters SharePoint does not allow in names, and files above the maximum size. The job report lists the failed items so you can fix them and run the job again.Does the tool download my files to my computer?
No. DT SharePoint Migration Tool transfers files directly between the clouds. Nothing is downloaded to your PC or stored by Data TB.Can I try it before I buy?
Yes. The free trial processes up to 500 MB with files under 20 MB, so you can run a real pilot with your own accounts.Final Thoughts
Migrating OneDrive to SharePoint is not hard, but it is easy to do carelessly. The files move easily. The parts that need thought are the ones about people: who should see what, and how they find it afterwards. Treat the migration as two jobs, moving the content and then setting access properly, and you will get a result that is cleaner than the original.
Start with a pilot folder. See what comes across on your own data, check the version history and dates, and set access with groups. If it looks right, scale it up.
Try it now: Download the free trial of DT SharePoint Migration Tool, sign in to OneDrive and SharePoint, and run a pilot on a real folder.